DOCX Signer User Manual
Digitally sign your Word, Excel and PowerPoint documents in a few clicks, with an invisible signature or with a visible signature line, add a trusted time stamp, let several people sign the same document, and sign whole folders automatically. No technical knowledge needed; developers find PowerShell, C# and VB.NET examples at the end.
1. What is DOCX Signer?
A Word, Excel or PowerPoint document can be changed by anyone who has the file. A digital signature solves two problems:
- Who signed it? The signature is created with your personal digital certificate, so it proves your identity.
- Was it changed? If even one character of the document is modified after signing, Word, Excel and PowerPoint report the signature as invalid.
The main function of DOCX Signer is to sign Office documents with X.509 digital certificates. The signatures are the same kind that Microsoft Office creates (File → Info → Protect Document → Add a Digital Signature), so the people who receive your documents see them in Word, Excel and PowerPoint without installing anything. You can sign a single document, or select an input folder and an output folder and sign hundreds of documents at once (bulk signing), which is ideal for the documents of a company. The same signatures can be created automatically, without any window, from the command line (section 14).
| What DOCX Signer does | Details |
|---|---|
| Invisible signature | Word (.docx, .docm), Excel (.xlsx, .xlsm) and PowerPoint (.pptx, .pptm) documents. Office shows the signature in the Signatures pane and in File → Info. |
| Visible signature | A signature line in a Word document, with the name and title of the signer, the date and, if you want, the image of your handwritten signature (section 8). |
| Time stamp | A trusted proof of the time of signing, from an independent time stamp server (XAdES-T and XAdES-LT, section 7.3). |
| Several signers | Prepare one signature line for each signer; each one signs his own line, with DOCX Signer or in Word (section 9). |
| Checking | The Verify Signatures window lists the signatures of a document and tells you whether each one is still valid (section 15). |
The signature is added inside the Office file. The text of the document stays exactly as it was. The signed copy is saved in the destination you choose, so your original file is never lost.
Who is this manual for?
- Users — sections 1 to 15 explain, step by step, how to install the product, register it, choose a certificate, sign documents, add visible signatures, let several people sign, and check the signatures.
- Developers and administrators — sections 16 to 18 explain that DOCX Signer is built on the Signature Library (SignLib), and show how to create the same signatures from Windows PowerShell, C# or VB.NET. One of the purposes of DOCX Signer is to let you see what the library can do before you write a single line of code.
Useful links
| What | Address |
|---|---|
| DOCX Signer product page (information, purchase, download) | https://www.signfiles.com/docx-signer/ |
| Download DOCX Signer (free trial) | https://www.signfiles.com/apps/DOCXSigner.msi |
| Signature Library (SignLib) used by DOCX Signer | https://www.signfiles.com/signature-library/ |
| Signature Library code samples | https://www.signfiles.com/code-samples/ |
| Support and contact | https://www.signfiles.com/contact/ |
2. Product installation
We recommend installing the product with an Administrator account. After the setup file is verified, the operating system might ask for your permission to install the program: click Yes.
What you need
- Windows 8 or later (including Windows 10, Windows 11 and Windows Server).
- Microsoft .NET Framework 4.6.2 or newer. It is already part of Windows 10 and Windows 11.
- A digital certificate to sign with. If you do not have one yet, you can create a test certificate (section 11).
- Microsoft Office is not needed to sign. It is needed only to open the documents and to see the signatures, as for the people who receive them: Office 2010 or later.
Installation steps
- Download the setup file. Get
DOCXSigner.msifrom the product page and run it. - If Windows SmartScreen appears, allow the program to run. You may see the window Windows protected your PC. Click More info and then Run anyway. See the explanation below.
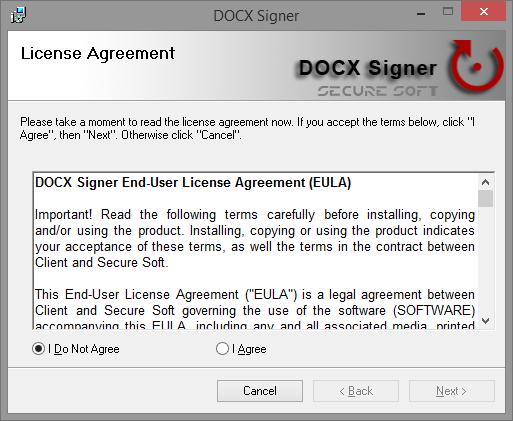
- Read the license agreement. Read the EULA (End-User License Agreement). If you want to continue, select I Agree and click Next until the setup is finished.
- Start the program. Start DOCX Signer from the Windows Start menu. By default the files are in the
Secure Soft\DOCX Signerfolder ofProgram Files(on a 64-bit Windows:C:\Program Files (x86)\Secure Soft\DOCX Signer).
What is Windows SmartScreen?
SmartScreen is a protection built into Windows. When you run a program you downloaded, Windows compares it with a list of programs that are known and were already downloaded by many people. A program that Windows does not know yet, for example a new version that was published recently, is shown as an unrecognized app, and the window below appears.
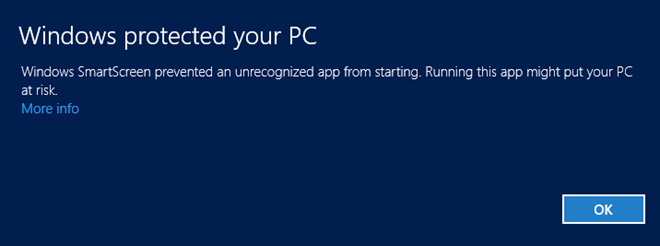
This message does not mean that the file contains a virus. It only means that Windows has no reputation data about it yet. To continue:
- Click More info. The name of the file and of the publisher are displayed.
- Click Run anyway and the setup starts.
Run the setup only if you downloaded it from www.signfiles.com. If you prefer, you can also right-click the downloaded DOCXSigner.msi, choose Properties, tick Unblock (at the bottom of the General tab) and click OK. The setup then starts without the SmartScreen message.
3. Trial period and product registration
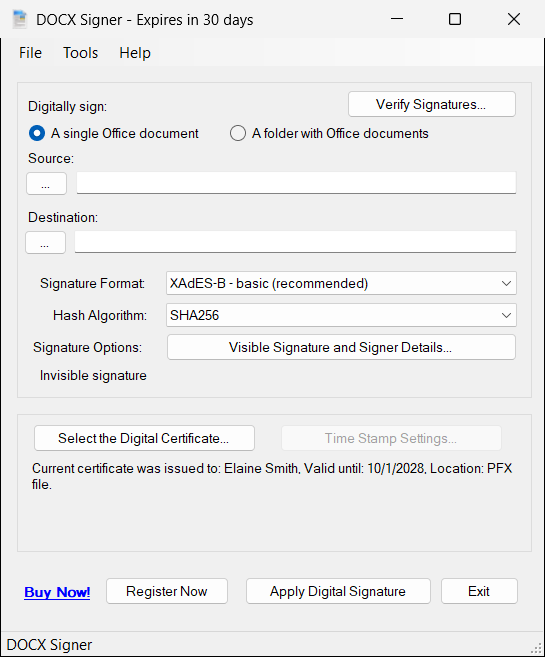
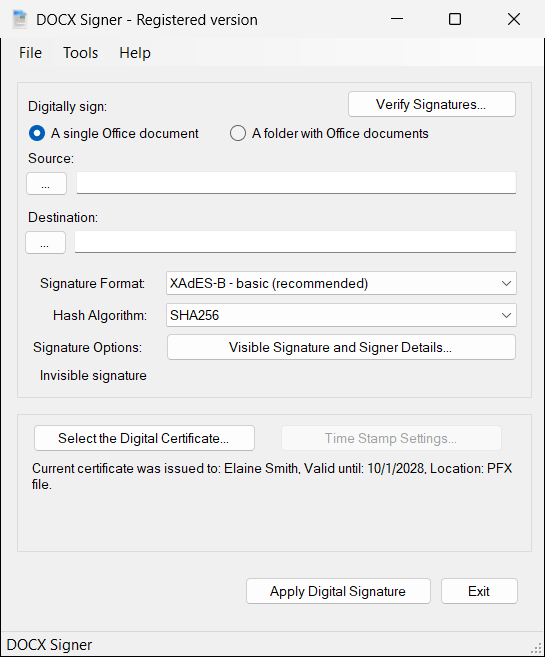
A new, unregistered installation works for a trial period of about 30 days. The title of the window shows how much is left, for example DOCX Signer - Expires in 30 days, and the buttons Register Now and Buy Now! are visible.
How to register the product
- Get a serial number. To register the product you need a serial number (also called license code). You can buy it online directly from the product page, https://www.signfiles.com/docx-signer/. You can also click Buy Now! in the program, which opens the same page.
- Open the registration window. Open DOCX Signer and click the Register Now button (or Help → Register Now...).
- Type the license code. Enter the received serial in the first box. The second box, Licensed to (optional), is for a name: if you type one, it is shown in the title of the window.
- Click Register. If the serial number is correct, the product is successfully registered.
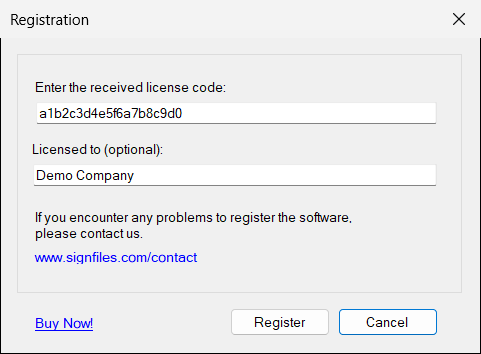
- The license code has 20 characters (letters and digits). Type it exactly as you received it. The messages License code cannot be empty. and Invalid license code. mean that the box is empty, or that the code was mistyped.
- The registration is saved for the Windows user account that registered the program. If another person uses the same computer with a different account, the registration is done once more with the same code.
- The registration belongs to the version of the program: version 3 is registered separately from the older versions 1 and 2.
When the trial has expired, the title shows Expired on and a date, and DOCX Signer no longer signs documents until you register.
4. Sign your first document
This is the whole process. It takes less than a minute once you have a certificate.
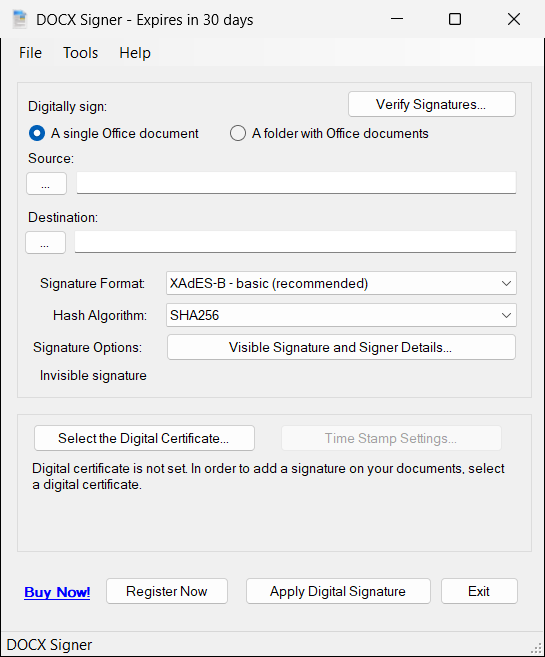
- Choose the document. Keep A single Office document selected. Click the ... button under Source and select the Word, Excel or PowerPoint file you want to sign.
- Check where the signed copy is saved. The Destination is filled in automatically with the same name followed by
[signed](for examplecontract[signed].docx). Click the ... button under Destination to choose another folder or name. The destination must be a different file from the source. - Select your digital certificate. Click Select the Digital Certificate.... Choose the certificate from the Windows store, or a
.pfxfile, and click OK (details in section 6). - Leave the format on the recommended value. XAdES-B - basic (recommended) and SHA256 are already selected and are the right choice for most uses (see section 7.3).
- Optional: a visible signature. To add a signature line to a Word document, click Visible Signature and Signer Details... (section 8). Without it, the signature is invisible.
- Click Apply Digital Signature. After a moment you see the message The file was digitally signed succesfully. Your signed document is in the destination you chose.
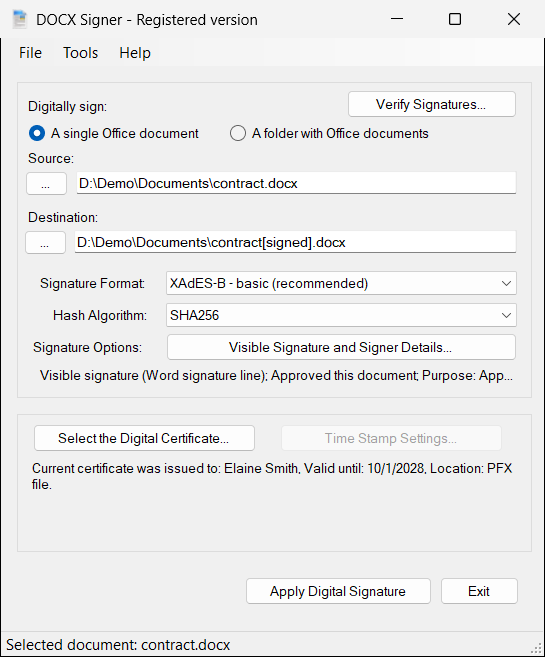
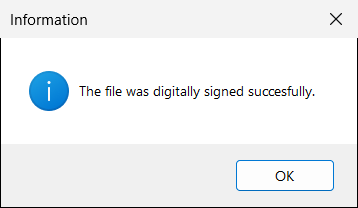
Before the signed document is saved, DOCX Signer verifies the new signature: a signed document is delivered only if its signature is valid, and only if the signatures that the document already had are still valid.
Drag a document or a folder onto the program window or onto its icon, or right-click an Office document and choose Open with → DOCX Signer. The file is selected as the source automatically.
5. The main window
| Item | What it does |
|---|---|
| Digitally sign | Choose A single Office document or A folder with Office documents (all the Word, Excel and PowerPoint documents of the folder are signed). |
| Verify Signatures... | Opens the window that lists and checks the signatures of a document (section 15). |
| Source | The document (or folder) you want to sign. Use the ... button to browse. |
| Destination | Where the signed document (or the signed documents) will be saved. |
| Signature Format | The kind of signature to create. The default, XAdES-B - basic, is the right choice for normal use. See section 7.3. |
| Hash Algorithm | The mathematical fingerprint used to detect changes: SHA256 (default), SHA384 or SHA512. Keep SHA256 unless the party receiving your documents asks for another one. The older SHA1 is not supported. |
| Signature Options | The button Visible Signature and Signer Details... opens the options of the visible signature and of the information about the signer (section 8). The line under it summarizes the current choice, for example Invisible signature. |
| Select the Digital Certificate... | Opens the certificate window (section 6). Below this button you always see which certificate is currently selected and until when it is valid. |
| Time Stamp Settings... | Available only for the formats that use a time stamp (XAdES-T and XAdES-LT). See section 10. |
| Apply Digital Signature | Signs the document or the folder. While a folder is being signed you can stop it with the Cancel button in the bottom bar; the bar also shows the progress. |
Menus
| Menu | Commands |
|---|---|
| File | Open (choose a document or folder), Apply Digital Signature..., Save Configuration, Save Configuration As..., Load Configuration..., Exit. |
| Tools | Select the Digital Certificate..., Time Stamp Settings..., Visible Signature and Signer Details..., Create a self-signed Digital Certificate..., Verify Signatures..., Prepare a Document for Several Signers..., Restore Defaults (asks you to confirm, then sets all options back to their original values). |
| Help | About... (program version and registration status) and Register Now... (only while the program is not registered). |
6. Digital certificates
A digital certificate is your electronic identity card, issued by a certification authority. To sign with DOCX Signer you need one. This section explains where certificates are kept and how to select the one you want to sign with.
6.1 Where the certificates are stored
A certificate that can sign documents has two parts: a public key (the part other people see, inside the certificate) and a private key (the secret part, which only you have). The digital signature is created with the private key. The certificates are kept in two places:
- in the Windows Certificate Store (called Microsoft Store in the program);
- in a PFX (or P12) file.
The Windows Certificate Store (Microsoft Store)
The Windows Certificate Store is the place where Windows keeps the certificates of the computer and of each user. In DOCX Signer it appears as Windows Certificate Store and Certificates Available on Microsoft Store.
The certificate store has nothing to do with the Microsoft Store where you download applications. It is only the traditional name of the list of certificates of Windows.
To see the certificates of your account:
- Press Win + R, type
certmgr.mscand press Enter. - Open Personal → Certificates.
(The older way still works: Internet Options → Content tab → Certificates button, tab Personal.)
To create digital signatures, the certificates of the Personal store are used. They must have a public and a private key. You can check this by opening a certificate: in the General tab Windows writes You have a private key that corresponds to this certificate.
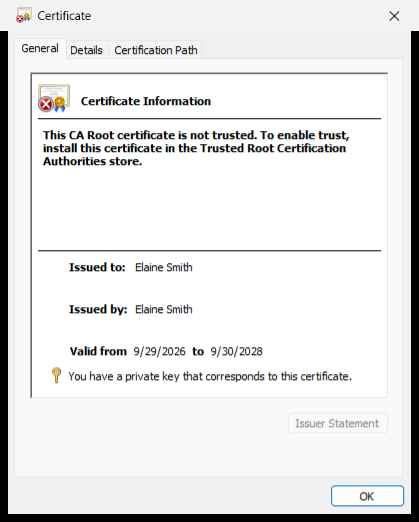
The private key itself can be stored:
- on the file system of the computer (for example, an imported PFX file);
- on a cryptographic smart card or USB token (like Aladdin eToken or SafeNet iKey) — see 6.2;
- on an HSM (Hardware Security Module), a device that keeps keys for a company.
The certificates you can use are listed per store location: Current User (your own certificates, the usual case) or Local Machine (certificates installed for all the users of the computer). DOCX Signer works with RSA and ECDSA (elliptic curve) certificates.
PFX and P12 files
Another way to keep a digital certificate is a PFX (or P12) file. The file contains the public and the private key of the certificate, and it is protected by a password, to keep the key pair safe.
A PFX/P12 file can be imported into the Windows Certificate Store: just open the file (double-click it) and follow the Certificate Import Wizard. After that, the certificate is available in the Personal list and you can select it from the Windows store without the file.
6.2 Certificates stored on smart cards or USB tokens
If your certificate is stored on a smart card or on a USB token (like Aladdin eToken or SafeNet), the private key never leaves the device: it signs inside the device. For DOCX Signer to use it, the certificate must appear in the Windows Certificate Store (6.1).
Usually, the driver of the smart card or its middleware (the software delivered with the token) installs the certificate in the Windows store automatically when the token is connected. If the certificate does not appear in the list, ask your vendor how to add it to the store, and look at the options of the middleware, like below:
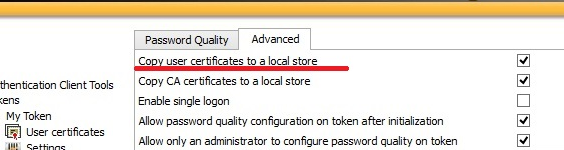
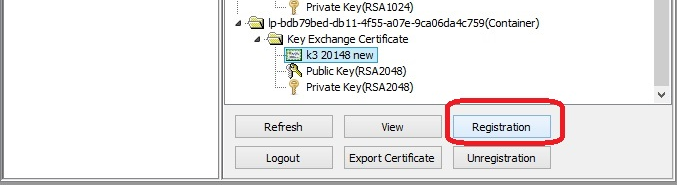
Once the certificate is in the store, select it in DOCX Signer as described in 6.3.
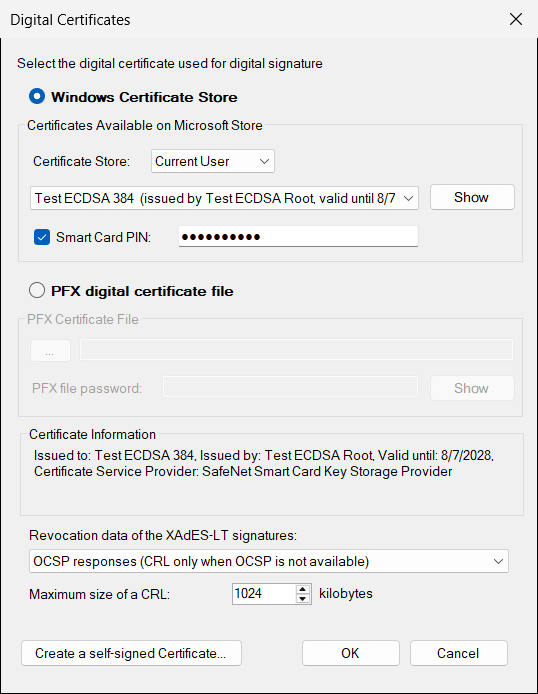
Normally Windows asks for the PIN of the card every time you sign. If you do not want the PIN window (for example for batch signatures, section 14), tick Smart Card PIN and type the PIN. The PIN is saved encrypted in the configuration, it belongs to the selected certificate, and it is cleared when you select another certificate. If the card rejects the PIN, DOCX Signer stops using it (so your card does not get locked by repeated wrong attempts): correct it in this window and try again.
6.3 Select the digital certificate for creating signatures
To digitally sign a document, a digital certificate must be selected first. Click Select the Digital Certificate... (or Tools → Select the Digital Certificate...). The certificate can be stored in the Windows store or in a PFX file.
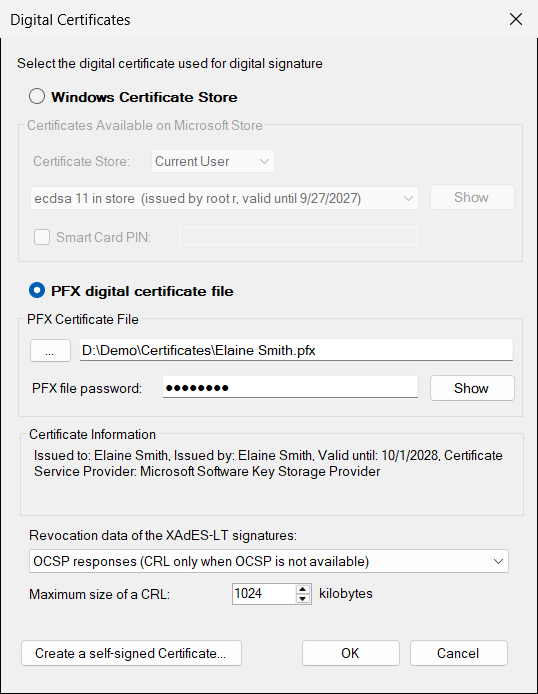
Option A: a PFX file
Some certificates are delivered as a file with the extension .pfx (or .p12), protected by a password.
- Select PFX digital certificate file.
- Click ... and pick your
.pfxfile (or type its path). - Type the PFX file password. The Show button next to it displays the details of the certificate so you can check you picked the right one.
- Click OK.
Option B: a certificate installed in Windows
Certificates installed on the computer, or stored on a USB token or smart card, appear in the Windows Certificate Store.
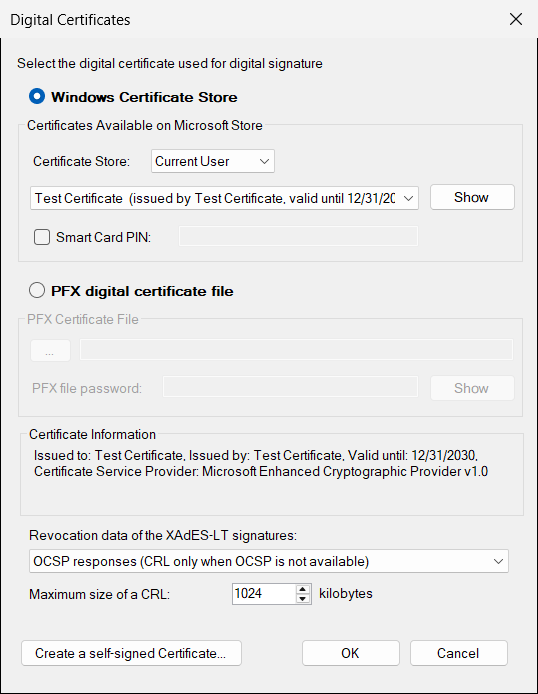
- Select Windows Certificate Store.
- In Certificate Store choose Current User (your own certificates, the usual case) or Local Machine (certificates installed for the whole computer).
- Pick your certificate from the list Certificates Available on Microsoft Store. The list shows the name of the owner, the issuer and the expiry date; an expired certificate is marked EXPIRED and is placed at the end. Show displays the full certificate.
- Click OK.
Certificate Information
In the lower part of the window, Certificate Information summarizes the selected certificate: to whom and by whom it was issued, until when it is valid, and Certificate Service Provider. The last one is the name of the software (or of the device driver) that manages the private key of the certificate. It helps you understand where the key is:
| Provider shown | Where the private key is |
|---|---|
| Microsoft Software Key Storage Provider, Microsoft Enhanced Cryptographic Provider | In your Windows account, on the computer (for example an imported PFX file). |
| eToken Base Cryptographic Provider, SafeNet Smart Card Key Storage Provider or similar names from the token vendor | On a smart card or USB token. A PIN is needed to sign. |
(The abbreviations are CSP, Cryptographic Service Provider, for the classic providers, and KSP, Key Storage Provider, for the newer ones. You do not have to choose them: DOCX Signer uses the provider of the certificate.) If the private key is not available on this computer, the line The private key is not available is added.
Long-term validation data
At the bottom of the window, Revocation data of the XAdES-LT signatures chooses what proof of validity is saved inside those signatures (see section 7.3):
- OCSP responses (CRL only when OCSP is not available) — the default and the best choice for most users.
- CRLs, CRLs and OCSP responses, or No revocation data (only the certificates).
- Maximum size of a CRL (default 1024 kilobytes) limits how large a revocation list may be to be included.
The button Create a self-signed Certificate... at the bottom left is explained in section 11.
If the certificate is expired or not valid yet, or its private key is missing, DOCX Signer refuses to sign and explains why. Renew the certificate or choose another one.
7. Electronic signature laws and signature formats
DOCX Signer creates the digital signatures of Microsoft Office: an XML signature stored inside the document, with the XAdES properties (XAdES 1.3.2) that Office 2010 and later write and read. This section explains what gives such a signature its value, and which format to choose.
7.1 Electronic signature laws
In the United States, the ESIGN Act and the Uniform Electronic Transactions Act (UETA), adopted by most states, give electronic signatures the same legal effect as handwritten signatures: a contract cannot be denied legal effect only because it was signed electronically. Many countries in Asia have laws dedicated to certificate-based digital signatures, for example India (Information Technology Act, Digital Signature Certificates issued by licensed certification authorities), Singapore (Electronic Transactions Act), Malaysia (Digital Signature Act), Japan (Act on Electronic Signatures and Certification Business) and Hong Kong (Electronic Transactions Ordinance).
A digital signature created with an X.509 certificate goes further than a typed name or a scanned image: it identifies the signer through his certificate and proves that the document was not changed after signing, which makes it strong evidence in case of a dispute.
7.2 What gives a signature its value
The value of a signature is given by the certificate and by the device that holds its private key, not by the software. DOCX Signer works with all the kinds of certificates:
| Certificate and private key | Result |
|---|---|
| A certificate issued by a recognised certification authority, with the private key on a smart card or USB token (for example a DSC token, section 6.2) | The strongest signature: the key cannot be copied, and Office trusts the certificate. |
| A certificate issued by a certification authority, kept in the Windows store or in a PFX file | A signature that identifies the signer, if the key is kept under his sole control. |
| A self-signed certificate (section 11) | A technically correct signature that nobody else trusts. Use it only for tests. |
The legal value of a signature depends on the certificate, on its issuer and on the law that applies to your documents. If a regulation or a partner requires a specific kind of certificate (for example a Class 3 DSC in India), use that certificate in DOCX Signer.
7.3 Signature formats
The format decides how much information is stored inside the signature. If you are not sure, keep the first one.
| Format in the list | What it adds | When to use it |
|---|---|---|
| XAdES-B — basic recommended | The signature, the signer's certificate and the signing time declared by the signer. This is the format of the signatures created by Office itself. | Everyday use: contracts, invoices, reports. Works offline and needs no extra settings. |
| XAdES-T — with time stamp | A trusted time stamp from an independent server that proves the exact time of signing. | When you must prove when the document was signed. Needs an Internet connection (see section 10). |
| XAdES-LT — long term validation | Time stamp plus the certificates and revocation proofs (OCSP/CRL) of the signer and of the time stamp authority. | Documents that must stay verifiable for years, even after the certificate expires or the issuer's servers are gone. |
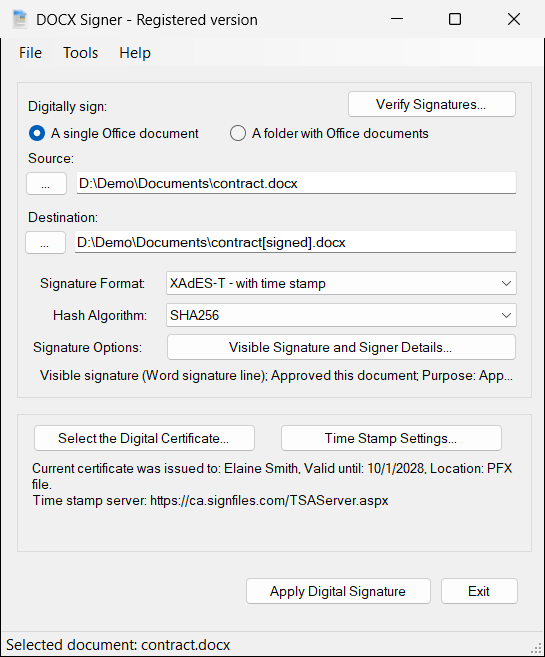
The letters come from the XAdES standard: Basic, Time-stamp and Long Term. The archival level (LTA) of the XML and PDF signatures is not used in Office documents.
7.4 Checking the signatures
Office documents are checked in the programs that open them: Word, Excel and PowerPoint show who signed, when, and whether the document was changed, and they check the trust of the certificate (section 15). DOCX Signer has its own Verify Signatures window for a quick check on your computer.
8. Visible signature and signer details
Click Visible Signature and Signer Details... in the main window (or Tools → Visible Signature and Signer Details...). The window has two parts: the information about the signer, which is part of every signature, and the visible signature of the Word documents.
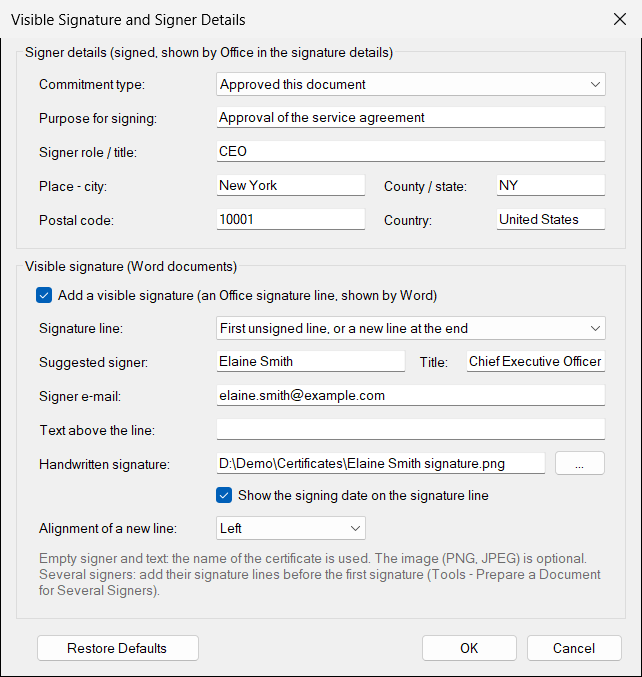
Signer details
These values are signed: they become part of the signature and nobody can change them later without invalidating it. Office shows them in the details of the signature (section 15). They are optional.
| Setting | Meaning |
|---|---|
| Commitment type | What the signer declares by signing: Approved this document, Created and approved this document, Created this document, Received this document, Sent this document, or (none). These are the commitment types of Office. |
| Purpose for signing | A short text, for example Approval of the service agreement. Office shows it as Purpose for signing this document. |
| Signer role / title | The role of the signer, for example CEO or Accountant. |
| Place | City, county or state, postal code and country where the document is signed. |
Visible signature (Word documents)
Tick Add a visible signature to sign a signature line: the box with an X, a line and the name of the signer that Word shows in the document. When the signature is valid, Word draws the signature on the line; if the document is changed later, the line shows Invalid signature.
| Setting | Meaning |
|---|---|
| Signature line | Where the signature goes:
|
| Suggested signer, Title, Signer e-mail | The name and the title written under a new signature line, for example Elaine Smith, Chief Executive Officer. When the name is empty, the name of the certificate is used. An existing signature line keeps the name and the title it already has. |
| Text above the line | The text written on the line, as a typed signature. When it is empty, the name of the certificate is written. |
| Handwritten signature | An image of your handwritten signature (PNG, JPEG, BMP or GIF), drawn on the line instead of the text. A PNG with a transparent background looks best. |
| Show the signing date on the signature line | Writes the date above the line. |
| Alignment of a new line | Left, center or right. |
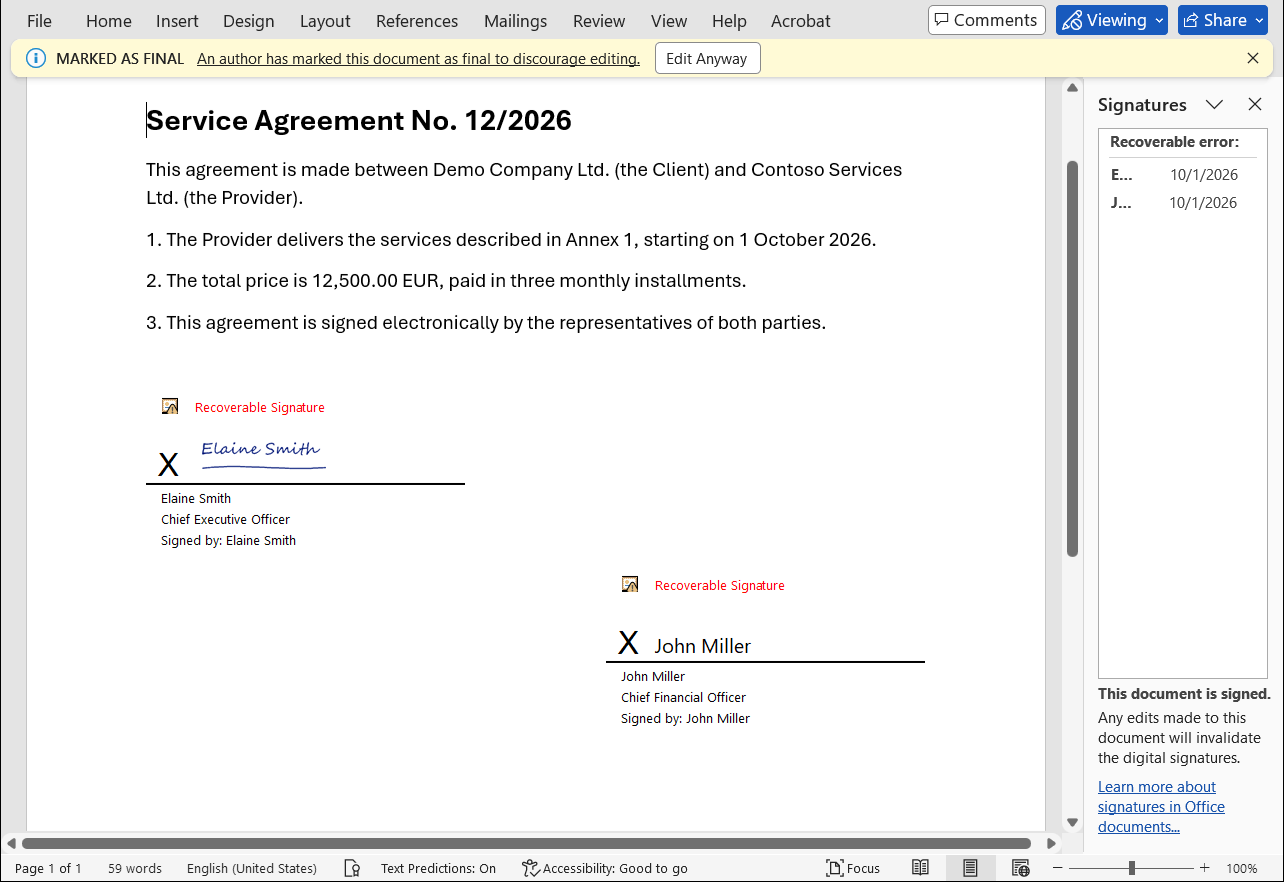
Signature lines exist only in Word documents. Excel and PowerPoint documents always get an invisible signature, even when the visible signature is ticked; when you sign a folder, the Word documents get the signature line and the other documents an invisible signature.
Adding a signature line changes the document, and every change invalidates the signatures that the document already has. So DOCX Signer refuses to add a new line to a document that is already signed, with the message The document is already signed: adding a new signature line would invalidate the existing signatures.... When several people must sign, add all the signature lines before the first signature (section 9); an invisible signature can always be added.
9. Several signers
A document can be signed by several people: every new signature is added to the document and the existing ones remain valid. For visible signatures, prepare the document first, with one signature line for each signer, and then send it to the signers.
- Open the preparation window. Click Tools → Prepare a Document for Several Signers....
- Choose the Word document and the file where the prepared document is saved (Save as; by default the same file).
- Type the signers, one per row: the name (required), the title, the e-mail address and, if you want, instructions for the signer. The lines are added at the end of the document, in this order, with the chosen Alignment.
- Click Add Signature Lines. The window shows the signature lines of the document.
- Each signer signs his own line. With DOCX Signer, tick Add a visible signature and keep First unsigned line... or choose An existing signature line only (section 8): the first line that is not signed yet is signed. The signer can also sign in Word, by double-clicking his line.
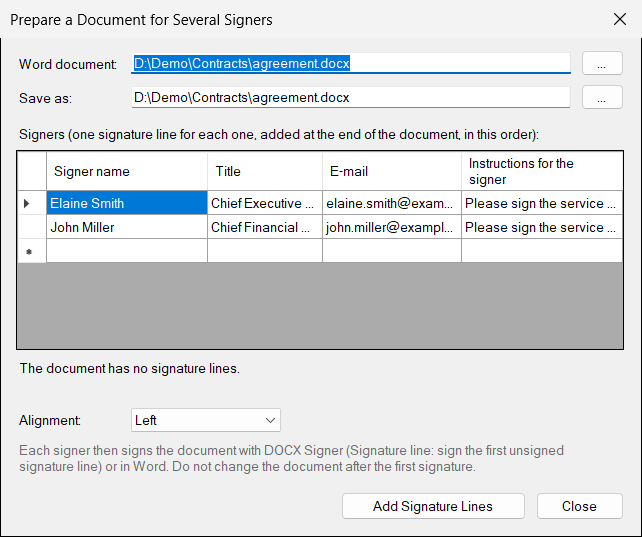
Each signature takes the first signature line that is not signed yet. Send the document to the signers in the order of the lines, or let them sign in Word, where each signer double-clicks his own line.
Every signer must sign the file signed by the previous one, without editing it. Word opens a signed document as Marked as final; if somebody edits it anyway, Word removes or invalidates the signatures.
10. Time stamp settings
A time stamp is issued by a Time Stamp Authority (TSA), an independent service. It proves that your signature existed at a given moment and cannot be back-dated. It is used by XAdES-T and XAdES-LT. Open it with Time Stamp Settings....
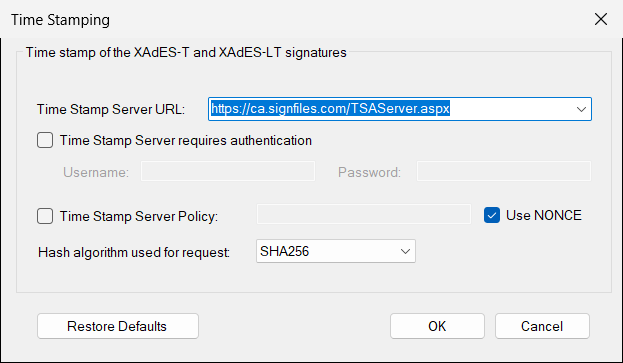
| Setting | Meaning |
|---|---|
| Time Stamp Server URL | The web address of the TSA service. The program starts with https://ca.signfiles.com/TSAServer.aspx. Use the address given by your provider if you have your own. |
| Time Stamp Server requires authentication | Tick it and type the Username and Password if your provider requires them. |
| Time Stamp Server Policy | Tick it only if your provider asked you to send a policy identifier, and type it. |
| Use NONCE | A random number that protects the request from being replayed. Leave it ticked. |
| Hash algorithm used for request | SHA256 by default. |
| Restore Defaults | Puts all these values back to the original ones. |
The computer must be able to reach the time stamp server while signing. If the address is not valid, DOCX Signer tells you to set it here before signing.
11. Creating a test certificate
If you do not have a certificate yet and only want to try the program, DOCX Signer can create a self-signed one. Open Tools → Create a self-signed Digital Certificate... (or the button in the certificate window).
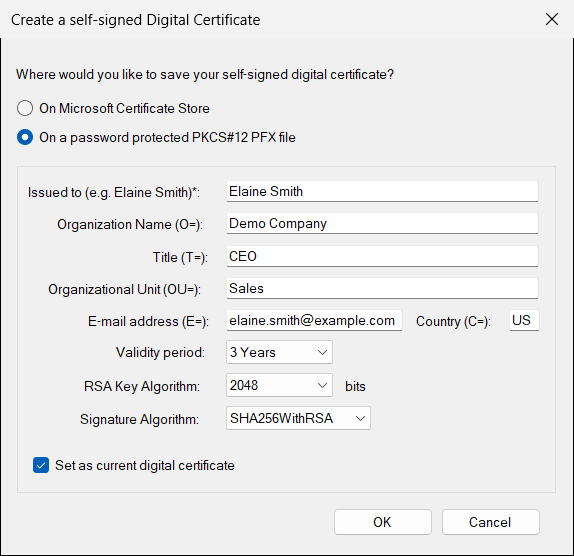
- Choose where to save it: On Microsoft Certificate Store or On a password protected PKCS#12 PFX file (you will be asked for the file name and a password).
- Type Issued to (your name, required) and, if you wish, the organization, unit, title, e-mail address and country code.
- Choose the Validity period (default 3 years), the RSA Key Algorithm length (default 2048 bits) and the Signature Algorithm (default SHA256WithRSA). The defaults are fine.
- Keep Set as current digital certificate ticked to use it right away, then click OK.
Nobody except you trusts a self-signed certificate. Word, Excel and PowerPoint show such a signature as Recoverable and say that the certificate is not trusted. For real documents, use a certificate issued by a recognised certification authority.
12. Signing a whole folder
To sign many documents at once, select A folder with Office documents.
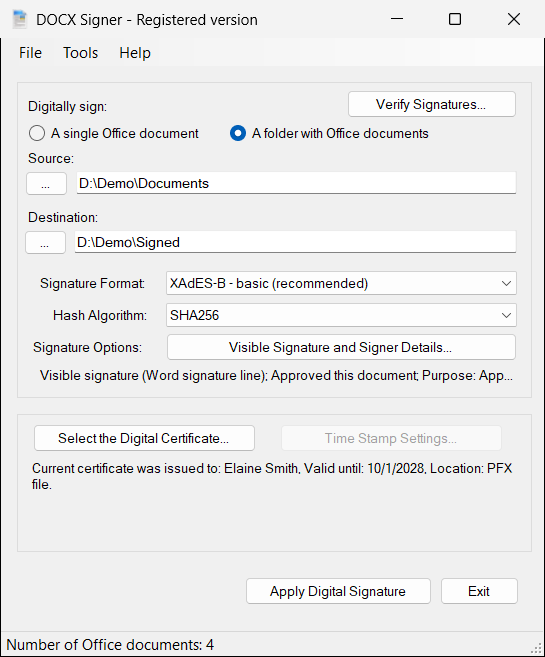
- Under Source choose the folder with your documents. The Word, Excel and PowerPoint documents of the folder are signed (
.docx,.docm,.xlsx,.xlsm,.pptx,.pptm); the other files and the temporary files of Office (~$...) are skipped. - Under Destination choose another folder. Each document is signed and saved with the same name in the destination folder. The source and the destination must be different folders.
- Click Apply Digital Signature. When it finishes you see how many documents were signed.
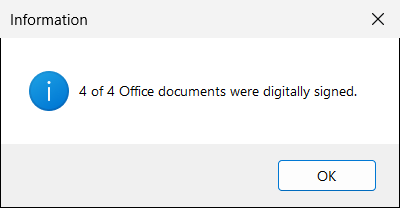
If files with the same names already exist in the destination, the program asks you first: Would you like to overwrite the existing file? (or, for a folder, how many documents will be overwritten). If a folder contains no Office documents you are told: The selected folder does not contain Office documents. If a document cannot be signed, the others are signed anyway and the errors are listed at the end (and saved in errorlog.txt, section 14).
13. Saving your settings
The program remembers your choices (certificate, format, hash algorithm, visible signature, time stamp server...) the next time you start it. You can also keep several sets of settings in files — for example one for contracts and one for reports:
- File → Save Configuration As... saves the current settings in a file you name.
- File → Load Configuration... loads them again.
- Tools → Restore Defaults returns everything to the original values.
A saved configuration file is also what the command line uses to sign documents automatically.
14. Batch signatures (automatically made without user intervention)
DOCX Signer can also sign without showing its window, for example from a scheduled task, from a script or from another program. Nobody has to click anything: the program reads the settings from a configuration file, signs, and closes.
By default, DOCX Signer is installed in the folder C:\Program Files (x86)\Secure Soft\DOCX Signer (on a 32-bit Windows: C:\Program Files\Secure Soft\DOCX Signer) and the program is DOCX Signer.exe.
Command line parameters
"DOCX Signer.exe" <source file> <destination file | destination folder> [<configuration file>]
"DOCX Signer.exe" <source folder> <destination folder> [<configuration file>]
"DOCX Signer.exe" <Office document | folder>      (opens the window with the file or folder selected)
"DOCX Signer.exe" /? (shows this help)- source folder: all the Office documents (docx, xlsx, pptx and their macro-enabled versions) of the folder are signed, with the same names, in the destination folder.
- configuration file: a file saved with File → Save Configuration As.... When it is not given, the current configuration of the window is used.
- Do not end a path written between quotes with a backslash: write
"C:\Folder", not"C:\Folder\". Windows would read the last backslash and quote as one character and the arguments would be mixed up.
Sign one file
To automatically sign a file, use a command like this one:
c:\Program Files (x86)\Secure Soft\DOCX Signer>"DOCX Signer.exe" c:\Contract.docx "c:\Contract[signed].docx"Sign a folder
To automatically sign all the documents of a folder:
c:\Program Files (x86)\Secure Soft\DOCX Signer>"DOCX Signer.exe" c:\InputFolder c:\OutputFolderCustom configuration
In some cases you need a different signature configuration (for example a different certificate, a visible signature or a time stamp) for different files or folders. To save a specific configuration, open the window, set everything you want, and go to File → Save Configuration As... Save the configuration in a file. Later you can use that file in batch mode to apply a different signature configuration on the signed files.
To automatically sign a folder using a custom configuration:
"DOCX Signer.exe" c:\InputFolder c:\OutputFolder c:\config-client2.xmlThe configuration file is an XML file that you can also edit with a text editor. The values of the visible signature and of the signer details are:
| Element | Values |
|---|---|
SignatureFormat, HashAlgorithm | XAdES-B, XAdES-T, XAdES-LT; SHA256, SHA384, SHA512 |
VisibleSignature | True or False |
SignatureLinePlacement | UseExistingOrAddNew, UseExisting, AddNew |
SuggestedSigner, SuggestedSignerTitle, SuggestedSignerEmail, SignatureText, SignatureImagePath | Texts and the path of the image of the handwritten signature (empty: not used) |
ShowSignDate, SignatureLineAlignment | True / False; Left, Center, Right |
CommitmentType | None, ProofOfApproval, ProofOfOrigin, ProofOfCreation, ProofOfReceipt, ProofOfSender |
SignatureComments, SignerRole, SignatureCity, SignatureStateOrProvince, SignaturePostalCode, SignatureCountry | Texts (empty: not used) |
A value that is not valid is not replaced silently in batch mode: nothing is signed, the result code is 2 and the message lists the wrong values. The passwords and the PIN are saved encrypted, so set them in the window.
Because nobody is there to answer, choose a certificate that does not need any interaction: a PFX file (its password is saved in the configuration, encrypted) or a smart card certificate with the Smart Card PIN saved (section 6.2). The smart card must be connected. The certificate must be valid: an expired certificate stops the signing, with the result code 2.
Result codes
| Code | Meaning |
|---|---|
| 0 | Success. |
| 1 | The signing failed (for a folder: at least one file failed). |
| 2 | The signing could not start: invalid arguments or configuration, the certificate is not valid, or DOCX Signer is not registered. |
DOCX Signer is a Windows application, so the command prompt does not wait for it. To wait and read the result code:
cmd:         start "" /wait "DOCX Signer.exe" C:\Demo\Contracts C:\Demo\Signed C:\Demo\contracts.config
             echo %errorlevel%

PowerShell:  (Start-Process "DOCX Signer.exe" -ArgumentList '"C:\Demo\Contracts" "C:\Demo\Signed" "C:\Demo\contracts.config"' -Wait -PassThru).ExitCode
Log files
Every signed file is recorded in log.txt, and every error in errorlog.txt. Both are in your user profile, in the folder %APPDATA%\Secure Soft\DOCX Signer\<version> (the last part is a folder named after the version of the program). The error messages are also written in the command window.
Set up everything once in the window, use Save Configuration As..., and then create a task in the Windows Task Scheduler that starts DOCX Signer.exe with the source folder, the destination folder and the configuration file. Use the same Windows account for the task that you used to set up the certificate and the registration.
15. Checking the signatures
The Verify Signatures window
Click Verify Signatures... in the main window (or Tools → Verify Signatures...). When a single document is selected, its signed copy (or the document itself) is opened automatically; otherwise choose a document with ....
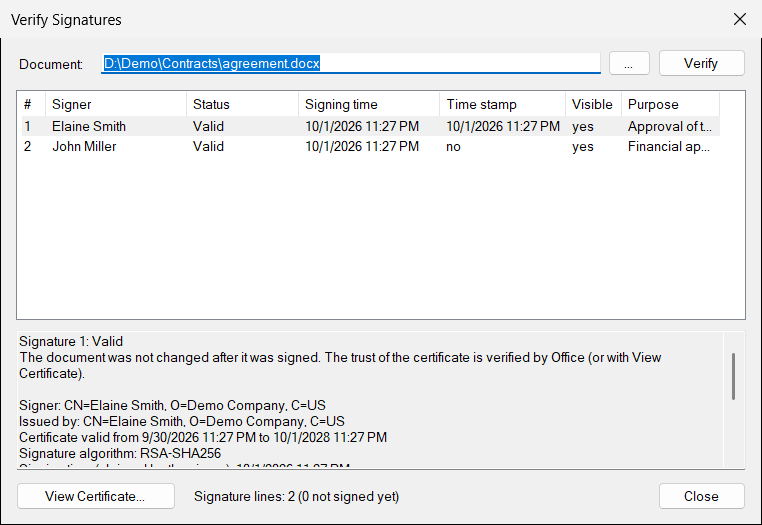
| Column | Meaning |
|---|---|
| Signer | The name of the certificate of the signer. |
| Status | Valid: the document was not changed after it was signed. INVALID - document changed, INVALID - signed part missing or INVALID signature: do not trust the document. The invalid signatures are written in red. |
| Signing time | The time declared by the signer (the clock of his computer). |
| Time stamp | The time of the time stamp (XAdES-T and XAdES-LT), or no. |
| Visible, Purpose | Whether the signature is a signature line, and the purpose written by the signer. |
Select a signature to see its details below the list: the certificate, the issuer, the algorithm, the level (XAdES-B, -T or -LT), the commitment type and the role. View Certificate... opens the Windows certificate window. The bottom line shows how many signature lines the document has and how many are not signed yet.
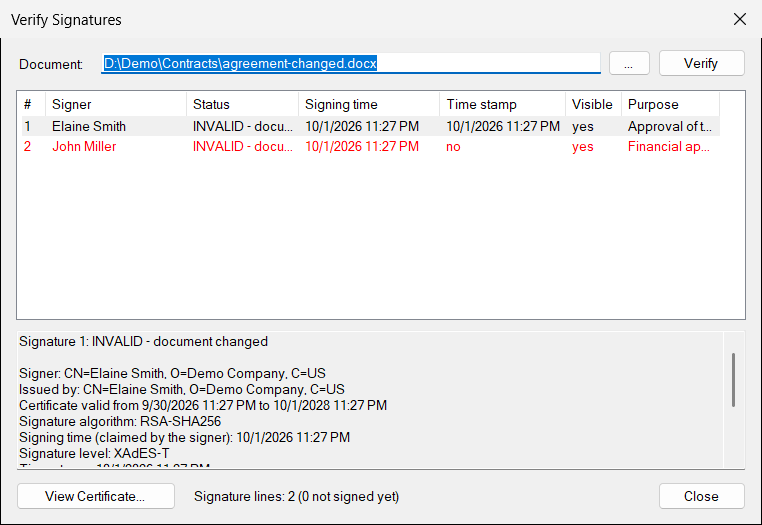
Verify Signatures checks that the document was not changed. Whether you trust the signer is your decision: check the signer and the issuer, or open the document in Office, which also checks the certificate. A self-signed test certificate shows the same name for both.
In Word, Excel and PowerPoint
Open the signed document. Office shows a Signatures message bar and opens the document as Marked as final. Click View Signatures... (or File → Info → View Signatures) to open the Signatures pane; double-click a signature, or choose Signature Details, to see the signer, the time, the purpose and the commitment type.
| What Office shows | Meaning |
|---|---|
| Valid signatures | The document was not changed and the certificate is trusted. |
| Recoverable signature / Recoverable error | The document was not changed, but Office cannot confirm the certificate: for example a self-signed test certificate, or a certificate whose issuer is not trusted on this computer. |
| Invalid signature | The document was changed after it was signed (or the signature is damaged). |
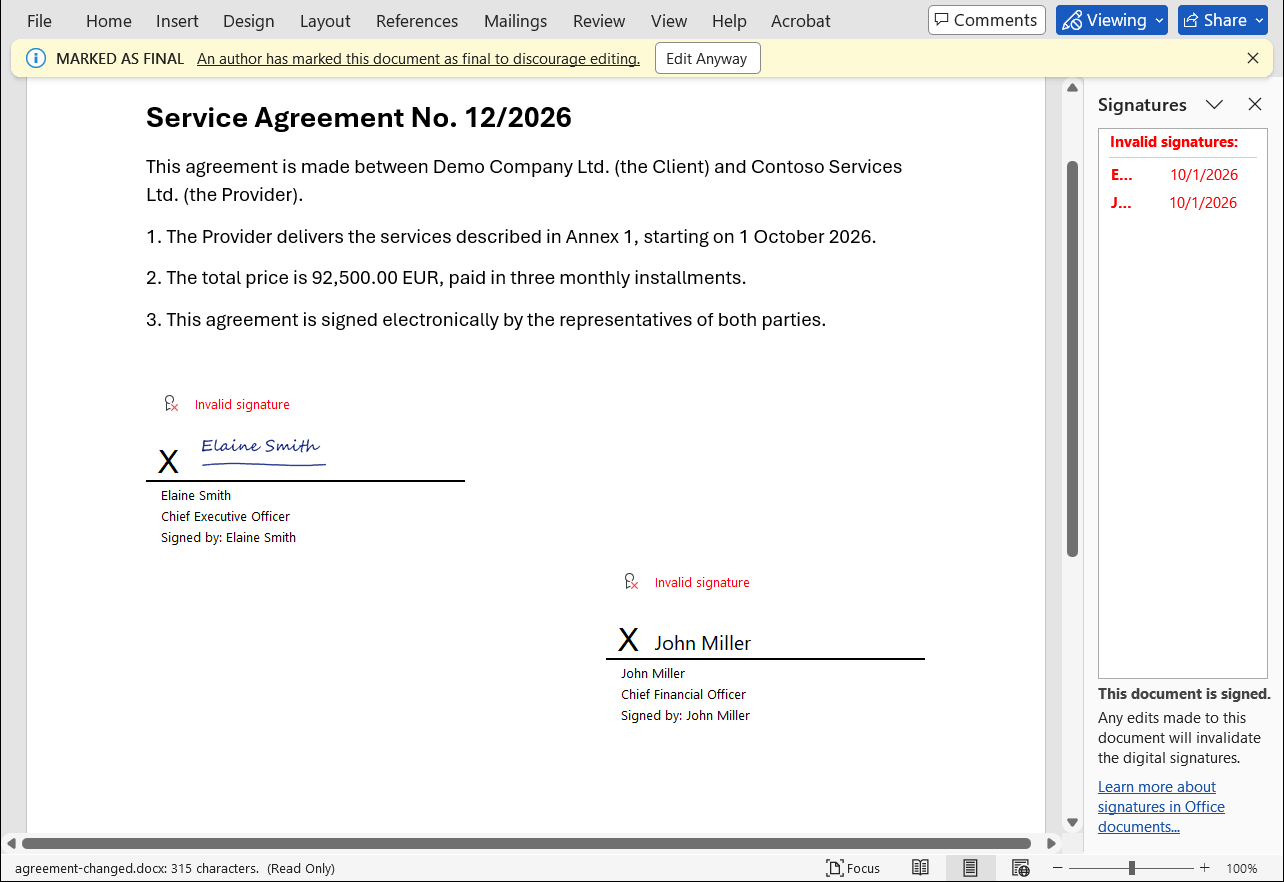
Ask the sender for the original signed file.
16. The Signature Library behind DOCX Signer
DOCX Signer is an application built on the Signature Library (SignLib), a library for .NET that creates and verifies digital signatures: PDF (PAdES), CAdES / PKCS#7, XML (XAdES), ASiC, Office and more. Everything DOCX Signer does is available to your own programs and scripts through the library:
- Library page: https://www.signfiles.com/signature-library/
- Download (library, samples and PowerShell scripts): https://www.signfiles.com/sdk/SignatureLibrary.zip
- Code samples: https://www.signfiles.com/code-samples/
The library works with Windows PowerShell, C#, VB.NET and ASP.NET, on .NET Framework 4.6.2 and on .NET 8 and .NET 9, and it supports certificates from PFX files, from the Windows store and from smart cards, USB tokens and HSMs.
DOCX Signer is also a demonstration of the library. Before you write any code, use the window to try a signature format, a hash algorithm, a time stamp server, a visible signature or a certificate, and look at the result in Word. Every choice you make in the window is one property of the library (see the table below), and the signed file you get is exactly what your code will produce.
From the window to the code
Office signatures are created with the class SignLib.OfficeSignature. The table shows what each setting of DOCX Signer is in the library.
| In DOCX Signer | In the library |
|---|---|
| Signature Format: XAdES-B, -T, -LT (section 7.3) | signature.SignatureStandard = XadesSignatureStandard.XadesB (or XadesT, XadesLT) |
| Hash Algorithm | signature.HashAlgorithm = HashAlgorithm.SHA256 (or SHA384, SHA512) |
| Digital certificate from a PFX file | DigitalCertificate.LoadCertificate(pfxFile, password) |
| Digital certificate from the Windows store or a smart card | DigitalCertificate.LoadCertificate(...) with a search criterion, or without parameters to show the selection window |
| Smart Card PIN | DigitalCertificate.SmartCardPin = "..." |
| Time Stamp Server URL, user name, password, policy, NONCE, hash (section 10) | signature.TimeStamping.ServerUrl, .UserName, .Password, .PolicyOid, .UseNonce, .HashAlgorithm |
| Revocation data and Maximum size of a CRL | signature.LtvLevel = XadesLtvLevel.IncludeOcspOnly (or IncludeCrl, IncludeCrlAndOcsp, None); signature.MaxCrlSize (in bytes in the code) |
| Commitment type, Purpose, Signer role, Place (section 8) | signature.CommitmentType, .SignatureComments, .SignerRole, .SignatureProductionPlace |
| Add a visible signature and its options | signature.SignatureLine = new OfficeSignatureLine { ... } (Placement, SuggestedSigner, SuggestedSignerTitle, SuggestedSignerEmail, SignatureText, SignatureImage, ShowSignDate, Alignment) |
| Apply Digital Signature | signature.ApplyDigitalSignature(inputFile, outputFile) |
| Prepare a Document for Several Signers (section 9) | AddSignatureLine(inputFile, outputFile, line), GetSignatureLines(file) |
| Verify Signatures (section 15) | GetSignatures, GetNumberOfSignatures, VerifyDigitalSignature, GetDigitalSignatureCertificate, GetSignatureAlgorithm |
| Create a self-signed certificate (section 11) | the class X509CertificateGenerator |
The library can do more than the window: an explicit signature policy, signing documents kept in memory or in streams, and signing with an external device through your own code. They are shown in section 18.
17. Digitally sign Office files using Windows PowerShell
The main functions of DOCX Signer are available in the SignLib library, which you can download from this link: https://www.signfiles.com/sdk/SignatureLibrary.zip
To digitally sign an Office file using Windows PowerShell, download the library above and inspect the Signature Library\PowerShell Scripts folder. The scripts below sign a document and list its signatures.
The signing script
Save it as signOfficeDocument.ps1, in the same folder with SignLib.dll. It creates a test PFX certificate on the fly, signs the document in the XAdES-B format (SHA256) with a visible signature line, and verifies the result. For an Excel or PowerPoint document the signature is invisible; to sign a Word document without a signature line, remove the two lines of SignatureLine.
#digitally sign an Office document (docx, xlsx, pptx) in the XAdES format, using a PFX certificate created on the fly
#the script can be configured to use an existing PFX file or a certificate loaded from Microsoft Store (smart card certificate)

if ($args.Length -eq 0)
{
    echo "Usage: signOfficeDocument.ps1 <unsigned file> <signed file>"
}
else
{
    #SignLib.dll must be on the same folder as the script (or write its full path)
    $DllPath = Join-Path $PSScriptRoot 'SignLib.dll'
    [System.Reflection.Assembly]::LoadFrom($DllPath) | Out-Null

    #create a PFX digital certificate
    $generator = new-object -typeName SignLib.Certificates.X509CertificateGenerator("serial number")
    $pFXFilePassword = "tempP@ssword"
    $generator.Subject = "CN=Your Certificate, E=useremail@email.com, O=Organization"
    $generator.Extensions.AddKeyUsage([SignLib.Certificates.CertificateKeyUsage]::DigitalSignature)
    $generator.Extensions.AddEnhancedKeyUsage([SignLib.Certificates.CertificateEnhancedKeyUsage]::DocumentSigning)

    echo "Create the certificate..."
    $certificate = $generator.GenerateCertificate($pFXFilePassword)

    #digitally sign the document (XAdES-B, SHA256)
    $sign = new-object -typeName SignLib.OfficeSignature("serial number")
    $sign.DigitalSignatureCertificate = [SignLib.Certificates.DigitalCertificate]::LoadCertificate($certificate, $pFXFilePassword)

    #a visible signature: a signature line at the end of a Word document (remove these lines for an invisible signature)
    $sign.SignatureLine = new-object -typeName SignLib.Office.OfficeSignatureLine
    $sign.SignatureLine.SuggestedSignerTitle = "Manager"

    echo "Perform the digital signature..."
    $sign.ApplyDigitalSignature($args[0], $args[1])

    #verify the signature
    echo ("Signatures: " + $sign.GetNumberOfSignatures($args[1]))
    echo ("Valid: " + $sign.VerifyDigitalSignature($args[1]))
}
How to run it
How to run the Windows PowerShell script from the command line:
powershell -executionPolicy bypass -file d:\signOfficeDocument.ps1 d:\test.docx "d:\test[signed].docx"The result in the window:
Create the certificate...
Perform the digital signature...
Signatures: 1
Valid: True
List the signatures of a document
Save it as verifyOfficeDocument.ps1, in the same folder with SignLib.dll:
#list the signatures of an Office document (docx, xlsx, pptx) and verify them

if ($args.Length -eq 0)
{
    echo "Usage: verifyOfficeDocument.ps1 <signed file>"
}
else
{
    $DllPath = Join-Path $PSScriptRoot 'SignLib.dll'
    [System.Reflection.Assembly]::LoadFrom($DllPath) | Out-Null

    $verifier = new-object -typeName SignLib.OfficeSignature("serial number")

    foreach ($info in $verifier.GetSignatures($args[0]))
    {
        echo ("Signature " + ($info.Index + 1) + ": " + $info.Status + ", signer: " + $info.SignerName + ", visible: " + $info.IsVisible + ", time stamp: " + $info.HasTimestamp)
    }
}
For the contract signed by two people (section 9):
powershell -executionPolicy bypass -file d:\verifyOfficeDocument.ps1 d:\agreement.docx

Signature 1: Success, signer: Elaine Smith, visible: True, time stamp: True
Signature 2: Success, signer: John Miller, visible: True, time stamp: False- Replace
"serial number"with the serial number you received for the library. Without it the library works in demonstration mode: it writes This is a demonstration of the digital signature software and waits 10 seconds before every signature and verification. -executionPolicy bypassallows this one script to run without changing the security settings of the computer.- Windows PowerShell 5.1 uses the .NET Framework version of
SignLib.dll; PowerShell 7 uses the .NET 8 / .NET 9 version. - To sign with an existing PFX file, remove the certificate generator and use
[SignLib.Certificates.DigitalCertificate]::LoadCertificate("d:\certificate.pfx", "password"). For a smart card certificate from the Windows store use the methods described in section 18.3.
18. Digitally sign Office files using C# or VB.NET
The main functions of DOCX Signer are available in the SignLib library (download). To digitally sign a file using C# or VB.NET, download the library, add a reference to SignLib.dll in your project, and inspect the sample projects of the package and the code samples page.
Office documents are signed with the class OfficeSignature (namespace SignLib). It creates the XAdES signatures of Microsoft Office at the levels B, T and LT (section 7.3), invisible or visible, and verifies them. Its properties and methods follow the same rules as the class XadesSignature of the XML signatures.
All the examples below use these namespaces. Every example was run with the library to check the result.
using SignLib;                 // OfficeSignature, HashAlgorithm
using SignLib.Certificates;    // DigitalCertificate
using SignLib.Office;          // OfficeSignatureLine, OfficeSignatureInfo
using SignLib.Xml;             // XadesSignatureStandard, XadesCommitmentType, XadesProductionPlace
18.1 Sign a document and verify the signature
The smallest program: load a certificate from a PFX file, sign, and verify. The signature format is XAdES-B and the hash is SHA256, exactly like the defaults of DOCX Signer. The signature is invisible.
using SignLib;
using SignLib.Certificates;

// "serial number" is the serial number of the library
OfficeSignature signature = new OfficeSignature("serial number");
signature.DigitalSignatureCertificate = DigitalCertificate.LoadCertificate("certificate.pfx", "123456");

// apply the digital signature: the input file is not changed, the signed copy is saved in the output file
signature.ApplyDigitalSignature("contract.docx", "contract-signed.docx");

// verify the signature
OfficeSignature verifier = new OfficeSignature("serial number");
Console.WriteLine("Signatures: " + verifier.GetNumberOfSignatures("contract-signed.docx"));
Console.WriteLine("Valid: " + verifier.VerifyDigitalSignature("contract-signed.docx"));
Console.WriteLine("Signer: " + verifier.GetDigitalSignatureCertificate("contract-signed.docx").Subject);
Console.WriteLine("Algorithm: " + verifier.GetSignatureAlgorithm("contract-signed.docx"));
The result:
Signatures: 1
Valid: True
Signer: CN=Elaine Smith, O=Demo Company, C=US
Algorithm: RSA-SHA256
The same example in VB.NET, with a visible signature:
Imports SignLib
Imports SignLib.Certificates
Imports SignLib.Office
Imports SignLib.Xml

Module Module1
    Sub Main()
        Dim signature As New OfficeSignature("serial number")
        signature.DigitalSignatureCertificate = DigitalCertificate.LoadCertificate("certificate.pfx", "123456")
        signature.SignatureStandard = XadesSignatureStandard.XadesB
        signature.HashAlgorithm = HashAlgorithm.SHA256

        'a visible signature: a signature line at the end of the Word document
        signature.SignatureLine = New OfficeSignatureLine()
        signature.SignatureLine.SuggestedSignerTitle = "Chief Executive Officer"

        'apply the digital signature
        signature.ApplyDigitalSignature("contract.docx", "contract-signed.docx")

        Dim verifier As New OfficeSignature("serial number")
        Console.WriteLine("Signatures: " & verifier.GetNumberOfSignatures("contract-signed.docx"))
        Console.WriteLine("Valid: " & verifier.VerifyDigitalSignature("contract-signed.docx"))
    End Sub
End Module
18.2 Signature levels, time stamp and long-term validation
The level of the signature is chosen with SignatureStandard. The levels that contain a time stamp (XadesT, XadesLT) need the address of a time stamp server (section 10). As for the XML signatures, a XadesB signature also gets a time stamp when TimeStamping.ServerUrl is set.
OfficeSignature signature = new OfficeSignature("serial number");
signature.DigitalSignatureCertificate = DigitalCertificate.LoadCertificate("certificate.pfx", "123456");

signature.HashAlgorithm = HashAlgorithm.SHA384;                        // SHA256 (default), SHA384 or SHA512
signature.SignatureStandard = XadesSignatureStandard.XadesLT;          // XadesB, XadesT or XadesLT
signature.TimeStamping.ServerUrl = new Uri("https://ca.signfiles.com/TSAServer.aspx");
signature.LtvLevel = XadesLtvLevel.IncludeOcspOnly;                    // the revocation data saved in the LT signatures

signature.ApplyDigitalSignature("contract.docx", "contract-lt.docx");
If the time stamp server asks for authentication, or you want to set other options of the request, use the other properties of TimeStamping:
signature.TimeStamping.UserName = "user";                  // only if the server requires authentication
signature.TimeStamping.Password = "password";
signature.TimeStamping.UseNonce = true;                    // a random number that protects the request
signature.TimeStamping.HashAlgorithm = HashAlgorithm.SHA256;
signature.MaxCrlSize = 2 * 1024 * 1024;                    // the largest CRL that is included, in bytes (default: 1 MB)
18.3 A certificate from the Windows store or a smart card
When the certificate is in the Windows store (for instance, a smart card certificate, section 6.2), load it with a search criterion. No window is shown, so the code can run without a user. RSA and ECDSA certificates are both supported.
OfficeSignature signature = new OfficeSignature("serial number");

// the first certificate of the current user whose common name (CN) is "Elaine Smith"
// true = only the valid certificates (issued by a trusted authority); false = any certificate, also a self-signed test one
signature.DigitalSignatureCertificate = DigitalCertificate.LoadCertificate(true, DigitalCertificateSearchCriteria.CommonNameCN, "Elaine Smith");

// the PIN of the smart card, to avoid the PIN window. It applies to the next signature, made on this thread
DigitalCertificate.SmartCardPin = "1234";

signature.ApplyDigitalSignature("contract.docx", "contract-signed.docx");
Other search criteria are the other fields of the subject (OrganizationO, EmailE...), the thumbprint and the serial number of the certificate. To let the user choose the certificate in a Windows window, call DigitalCertificate.LoadCertificate() without parameters.
A signing device that is not in the Windows store (an HSM, a remote signing service, a PKCS#11 token) can be used through your own class that implements SignLib.Certificates.IExternalSignature: set DigitalCertificate.UseExternalSignatureProvider before ApplyDigitalSignature, and give the public certificate in DigitalSignatureCertificate.
18.4 A visible signature
Set SignatureLine to sign a signature line of a Word document (section 8). Without it, the signature is invisible.
OfficeSignature signature = new OfficeSignature("serial number");
signature.DigitalSignatureCertificate = DigitalCertificate.LoadCertificate("certificate.pfx", "123456");

signature.SignatureLine = new OfficeSignatureLine
{
    Placement = OfficeSignatureLinePlacement.UseExistingOrAddNew,   // the first unsigned line, or a new one at the end
    SuggestedSigner = "Elaine Smith",                                // the name under the line
    SuggestedSignerTitle = "Chief Executive Officer",
    SuggestedSignerEmail = "elaine.smith@example.com",
    SignatureImage = File.ReadAllBytes("signature.png"),             // the handwritten signature (optional)
    ShowSignDate = true,
    Alignment = OfficeSignatureLineAlignment.Right
};

signature.ApplyDigitalSignature("contract.docx", "contract-visible.docx");
The other values of Placement are UseExisting (an existing unsigned line only; set SetupId to choose a specific line) and AddNew (always a new line). SignatureText replaces the name written on the line; Width and Height set the size of a new line, in points (default 192 x 96).
18.5 Several signers
Prepare the document with one signature line for each signer, before the first signature; then each signer signs the first line that is not signed yet. The index of the signatures starts at 0.
// 1. prepare the document: one signature line for each signer, BEFORE the first signature
OfficeSignature document = new OfficeSignature("serial number");
document.AddSignatureLine("contract.docx", "agreement.docx", new OfficeSignatureLine { SuggestedSigner = "Elaine Smith", SuggestedSignerTitle = "Chief Executive Officer" });
document.AddSignatureLine("agreement.docx", "agreement.docx", new OfficeSignatureLine { SuggestedSigner = "John Miller", SuggestedSignerTitle = "Chief Financial Officer" });

// 2. each signer signs the first signature line that is not signed yet
OfficeSignature first = new OfficeSignature("serial number");
first.DigitalSignatureCertificate = DigitalCertificate.LoadCertificate("manager.pfx", "123456");
first.SignatureLine = new OfficeSignatureLine { Placement = OfficeSignatureLinePlacement.UseExisting };
first.ApplyDigitalSignature("agreement.docx", "agreement.docx");          // the output can be the input file

OfficeSignature second = new OfficeSignature("serial number");
second.DigitalSignatureCertificate = DigitalCertificate.LoadCertificate("accountant.pfx", "123456");
second.SignatureLine = new OfficeSignatureLine { Placement = OfficeSignatureLinePlacement.UseExisting };
second.ApplyDigitalSignature("agreement.docx", "agreement.docx");

// 3. check the signatures and the signature lines
OfficeSignature verifier = new OfficeSignature("serial number");
int count = verifier.GetNumberOfSignatures("agreement.docx");
for (int i = 0; i < count; i++)
    Console.WriteLine("Signature " + (i + 1) + ": " + verifier.VerifyDigitalSignature("agreement.docx", i) + ", signer: "
        + verifier.GetDigitalSignatureCertificate("agreement.docx", i).GetNameInfo(X509NameType.SimpleName, false));

foreach (OfficeSignatureLineInfo line in verifier.GetSignatureLines("agreement.docx"))
    Console.WriteLine(line);
The result:
Signature 1: True, signer: Elaine Smith
Signature 2: True, signer: John Miller
Elaine Smith, Chief Executive Officer - signed
John Miller, Chief Financial Officer - signed(X509NameType is in the namespace System.Security.Cryptography.X509Certificates.) An invisible signature needs no preparation: sign the signed file again without SignatureLine. AddSignatureLine on a document that is already signed throws an InvalidOperationException, because the new line would invalidate the existing signatures.
18.6 Signer details and signature policy
// the commitment declared by the signer, shown by Office as "Commitment type"
signature.CommitmentType = XadesCommitmentType.ProofOfApproval;

// the purpose for signing the document and the role of the signer
signature.SignatureComments = "Approval of the service agreement";
signature.SignerRole = "Chief Executive Officer";

// the place where the signature was created
signature.SignatureProductionPlace = new XadesProductionPlace { City = "New York", StateOrProvince = "NY", PostalCode = "10001", CountryName = "United States" };

// an explicit signature policy (by default the policy is implied, as for the signatures of Office):
// identifier (OID or URI), digest of the policy document, the algorithm of the digest, the address of the policy
signature.SetSignaturePolicyInformation("2.16.724.1.3.1.1.2.1.9", policyHash, "SHA256", "https://example.com/policy.pdf");
18.7 Read the signatures of a document
GetSignatures verifies every signature and returns its details: the same information as the Verify Signatures window.
OfficeSignature verifier = new OfficeSignature("serial number");

foreach (OfficeSignatureInfo info in verifier.GetSignatures("agreement.docx"))
{
    Console.WriteLine("Signature " + (info.Index + 1) + ": " + info.Status);
    Console.WriteLine("  Signer:       " + info.SignerName);
    Console.WriteLine("  Signing time: " + info.SigningTime.Value.ToLocalTime());          // the times are in UTC
    Console.WriteLine("  Time stamp:   " + (info.HasTimestamp ? info.TimestampTime.Value.ToLocalTime().ToString() : "no"));
    Console.WriteLine("  Visible:      " + info.IsVisible);
    Console.WriteLine("  Algorithm:    " + info.SignatureAlgorithm);
}
The result:
Signature 1: Success
  Signer:       Elaine Smith
  Signing time: 10/1/2026 11:31:48 PM
  Time stamp:   no
  Visible:      True
  Algorithm:    RSA-SHA256
Signature 2: Success
  Signer:       John Miller
  ...
Status is Success for a valid signature, ContentModified when the document was changed after it was signed, ReferenceNotFound when a signed part of the document is missing, and InvalidSignature otherwise. The other properties are Certificate, HasValidationData (XAdES-LT), SignatureComments, CommitmentType, SignerRole and SetupId (the signature line).
A changed document
If the document is modified after the signature, the verification returns False. For example, after the price of the contract is edited from 12,500.00 to 92,500.00:
Console.WriteLine("Valid: " + verifier.VerifyDigitalSignature("agreement-changed.docx"));
Console.WriteLine("Status: " + verifier.GetSignatures("agreement-changed.docx")[0].Status);
// Valid: False
// Status: ContentModified
The library checks that the document was not changed. To check the certificate itself (expired, revoked), use DigitalCertificate.VerifyDigitalCertificate, or open the document in Office, which also checks the trust of the certificate.
18.8 Excel, PowerPoint, streams and byte arrays
OfficeSignature signature = new OfficeSignature("serial number");
signature.DigitalSignatureCertificate = DigitalCertificate.LoadCertificate("certificate.pfx", "123456");

// Excel and PowerPoint documents are signed in the same way (invisible signatures)
signature.ApplyDigitalSignature("budget.xlsx", "budget-signed.xlsx");
signature.ApplyDigitalSignature("presentation.pptx", "presentation-signed.pptx");

// a document in memory (for example from a database or a web request)
byte[] signed = signature.ApplyDigitalSignature(File.ReadAllBytes("contract.docx"));

using (MemoryStream stream = new MemoryStream(signed))
    Console.WriteLine("Valid: " + new OfficeSignature("serial number").VerifyDigitalSignature(stream));
ApplyDigitalSignature(Stream) signs a document in place, in a readable, writable and seekable stream. Every method that reads a file has a version with a Stream.
18.9 How the signature looks
An Office document is a ZIP package. The signature is added as a new part, _xmlsignatures/sig1.xml (sig2.xml for the second signer...), and a signature line adds its image, word/media/signatureline1.emf. The values below are shortened.
<Signature Id="idPackageSignature" xmlns="http://www.w3.org/2000/09/xmldsig#">
  <SignedInfo>
    <SignatureMethod Algorithm="http://www.w3.org/2001/04/xmldsig-more#rsa-sha256" />
    <Reference URI="#idPackageObject" ...>      <!-- the signed parts of the document -->
    <Reference URI="#idOfficeObject" ...>       <!-- the Office information: signature line, purpose -->
    <Reference URI="#idSignedProperties" ...>   <!-- the XAdES properties -->
    <Reference URI="#idValidSigLnImg" ...>      <!-- the images of the signed line, valid and invalid -->
    <Reference URI="#idInvalidSigLnImg" ...>
  </SignedInfo>
  <SignatureValue>vMvzpuO0BHkd...</SignatureValue>
  <KeyInfo><X509Data><X509Certificate>MIIDCjCCAfKg...</X509Certificate></X509Data></KeyInfo>
  <Object Id="idPackageObject">
    <Manifest>
      <Reference URI="/word/document.xml?ContentType=application/vnd.openxmlformats-officedocument.wordprocessingml.document.main+xml">
        <DigestMethod Algorithm="http://www.w3.org/2001/04/xmlenc#sha256" />
        <DigestValue>IAGLE3St0Vxj...</DigestValue>
      </Reference>
      ...                                          <!-- the styles, the images, the relationships... -->
    </Manifest>
    <SignatureProperties> ... <mdssi:Value>2026-10-01T20:31:48Z</mdssi:Value> ... </SignatureProperties>
  </Object>
  <Object Id="idOfficeObject"> ... <SignatureInfoV1> <SetupID>{...}</SetupID> ... </SignatureInfoV1> ... </Object>
  <Object>
    <xd:QualifyingProperties Target="#idPackageSignature" xmlns:xd="http://uri.etsi.org/01903/v1.3.2#">
      <xd:SignedProperties Id="idSignedProperties">
        <xd:SignedSignatureProperties>
          <xd:SigningTime>2026-10-01T20:31:48Z</xd:SigningTime>
          <xd:SigningCertificate> ... </xd:SigningCertificate>
          <xd:SignaturePolicyIdentifier><xd:SignaturePolicyImplied /></xd:SignaturePolicyIdentifier>
        </xd:SignedSignatureProperties>
      </xd:SignedProperties>
    </xd:QualifyingProperties>
  </Object>
  <Object Id="idValidSigLnImg">AQAAAGwAAAAA...</Object>
  <Object Id="idInvalidSigLnImg">AQAAAGwAAAAA...</Object>
</Signature>
A time stamp (XAdES-T and XAdES-LT) and the validation data (XAdES-LT) are added as unsigned properties of the signature, after SignedProperties.
18.10 Good to know
| Situation | What happens |
|---|---|
No valid serial number in new OfficeSignature("...") | The library works in demonstration mode: it writes a message and waits 10 seconds before each signature and verification. |
HashAlgorithm.SHA1 | A NotSupportedException is thrown: SHA1 is not used for new signatures. |
XAdES-T or -LT without TimeStamping.ServerUrl | An ArgumentException is thrown: the time stamp server is required. |
XadesSignatureStandard.XadesLTA | A NotSupportedException is thrown: the archival level is not used for Office documents. |
DigitalSignatureCertificate not set | A NullReferenceException is thrown. |
| The signing fails | The output file is deleted (unless it is the input file), so you never keep a half-made signed document. |
SignatureLine for an Excel or PowerPoint document | A NotSupportedException is thrown: the signature lines exist only in Word documents. |
| A new signature line in a document that is already signed | An InvalidOperationException is thrown, and the document is not changed. |
UseExisting and no unsigned signature line | An InvalidOperationException is thrown: The document has no unsigned signature line. |
VerifyDigitalSignature(file) for a document without signatures | A CryptographicException is thrown: The document has no signature. |
| .NET 8 / .NET 9 on Linux or macOS | Invisible signatures and the verification work on all the platforms. The visible signatures (and AddSignatureLine) draw their images with System.Drawing and need Windows: on the other platforms they throw a PlatformNotSupportedException. |
19. Problems and solutions
| What you see | What to do |
|---|---|
| Windows protected your PC when you start the setup | Windows SmartScreen does not know the new setup file yet. Click More info and then Run anyway, if you downloaded the file from www.signfiles.com (section 2). |
| Invalid license code. | The serial number has 20 characters. Retype it exactly as you received it, without extra characters (section 3). |
| Digital certificate is not set. In order to add a signature on your documents, select a digital certificate. | Click Select the Digital Certificate... and choose a certificate (section 6). |
| The certificate of the smart card or USB token is not in the list | Connect the token and check that its middleware is installed. The certificate must be in the Windows Certificate Store: open certmgr.msc and look in Personal. If it is not there, use the options of the middleware that copy or register the certificates in the Windows store (section 6.2). Then open the certificate window again. |
| The digital certificate ... expired on ... An expired certificate cannot be used to sign documents. | Choose a valid certificate or renew yours with your provider. |
| The private key of the digital certificate cannot be found. | The certificate on the computer has no key to sign with. Import the full certificate (including the private key), or connect your USB token. |
| PFX digital signature certificate error ... | The PFX password is wrong, or the file is damaged. Retype the password in the certificate window. |
| The smart card or token PIN is rejected | Correct the PIN in the certificate window. The program will not keep trying with a wrong PIN, to protect the token. |
| The XAdES-T signatures require a time stamp server, but the Time Stamp Server URL is not valid. | Open Time Stamp Settings... and type a valid address (section 10). Also check your Internet connection. |
| The document is already signed: adding a new signature line would invalidate the existing signatures... | The document is already signed and has no free signature line. Sign it without a visible signature, or prepare the signature lines of all the signers before the first signature (section 9). |
| The document has no unsigned signature line. | The option An existing signature line only is selected, but all the signature lines are already signed (or there is none). Choose another option in Visible Signature and Signer Details.... |
| The image of the handwritten signature cannot be read... | The image file was moved or is not a PNG, JPEG, BMP or GIF image. Choose it again in Visible Signature and Signer Details..., or clear the box. |
| The selected folder does not contain Office documents. | Pick a folder that contains .docx, .xlsx or .pptx files. The old formats .doc, .xls and .ppt are not supported: open them in Office and save them in the new format. |
| The destination file for the signed document already exists. Would you like to overwrite the existing file? | Click Yes to replace it, or No and choose another file name. |
| DOCX Signer has expired. Would you like to purchase the registered version...? | The trial period ended. Register with your license code (section 3). |
| The batch command does nothing, or the result code is 2 | Read the message in the command window and the file errorlog.txt (section 14). The usual causes: a path that ends with a backslash inside quotes, a configuration file that does not exist, a value of the configuration that is not valid, an expired certificate, or a program that is not registered. |
| Word shows Recoverable Signature | The document was not changed, but Word does not trust the certificate (for example a self-signed test certificate). Use a certificate issued by a recognised certification authority, or install the root certificate of your company on the computers that check the documents. |
| Word shows Invalid signature | The document was changed after signing, or the signature is damaged. Get the original signed file again. |
| Library: the program waits 10 seconds and writes This is a demonstration of the digital signature software | The serial number of the library is missing or not valid. Write the serial number in new OfficeSignature("...") (section 18). |
Library: NotSupportedException when you sign | The hash algorithm is SHA1, the level is XAdES-LTA, or a visible signature was requested for an Excel or PowerPoint document (section 18.10). |
Visit www.signfiles.com or use the contact link shown in the registration window, www.signfiles.com/contact.
20. Glossary
| Term | In plain words |
|---|---|
| Digital signature | An electronic seal added to a document. It shows who signed and that the content was not changed. |
| Digital certificate | Your electronic identity card, issued by a certification authority. It contains your name and a key used to sign. |
| Office document (Office Open XML) | The format of the .docx, .xlsx and .pptx files: a ZIP package of XML files. The signatures are stored inside the package. |
| Signature line | The box of a Word document where a signature is shown: an X, a line, the name and the title of the signer. Created in Word with Insert → Signature Line, or by DOCX Signer. |
| Visible / invisible signature | A visible signature is drawn on a signature line of the document. An invisible signature is listed only in the Signatures pane of Office. Both protect the whole document in the same way. |
| Commitment type | What the signer declares by signing, for example Approved this document. |
| Marked as final | Office opens a signed document as read-only, to avoid changes that would invalidate the signatures. |
| PFX file | A file (.pfx or .p12, the PKCS#12 format) that holds a certificate and its private key, protected by a password. |
| Windows Certificate Store (Microsoft Store) | The place where Windows keeps the certificates installed on the computer or available from tokens and smart cards. It is not the Microsoft Store of applications. Open it with certmgr.msc. |
| Private key | The secret part of your certificate. Only you should have it. It is what makes a signature yours. |
| Smart card / USB token | A small device that keeps your private key and signs inside it, so the key cannot be copied. It is protected by a PIN. |
| Middleware | The software delivered with a smart card or token (for example SafeNet Authentication Client). It lets Windows and the programs use the device, and usually adds its certificates to the Windows store. |
| HSM | Hardware Security Module: a device that keeps the keys of a company and signs on request. |
| CSP / KSP | Cryptographic Service Provider / Key Storage Provider: the component that manages the private key. Certificate Service Provider in DOCX Signer shows its name. |
| RSA / ECDSA | The two kinds of keys of the signing certificates. DOCX Signer works with both. |
| Windows SmartScreen | A protection of Windows that warns you about programs it does not know yet. A warning does not mean that the program is infected. |
| Hash (SHA256) | A short fingerprint of the document. If the document changes, the fingerprint changes. |
| XAdES | The ETSI standard for advanced electronic signatures in XML. Office signatures are XML signatures with XAdES properties: signing time, signer certificate, time stamps and long-term validation data. |
| ESIGN Act, UETA | The laws of the United States that give electronic signatures the same legal effect as handwritten ones (section 7). |
| DSC | Digital Signature Certificate: in India and in other countries, a certificate issued by a licensed certification authority, usually on a USB token. |
| Time stamp / TSA | A proof of time issued by a trusted independent service (Time Stamp Authority). |
| OCSP / CRL | Ways to ask the certification authority whether a certificate was cancelled (revoked). The answers can be stored in the signature. |
| Self-signed certificate | A certificate you create yourself. It works technically but nobody else trusts it. Use it only for tests. |
| Serial number (license code) | The code that registers DOCX Signer, received after the purchase. The Signature Library has its own serial number. |
| SignLib (Signature Library) | The .NET library on which DOCX Signer is built. It lets programs and PowerShell scripts create and verify the same signatures. |
| Batch signing | Signing many documents in one operation, or automatically, without a user, from the command line. |
21. Warning and disclaimer, trademarks
Every effort has been made to make this manual as complete and accurate as possible, but no warranty or fitness is implied. The information provided is on an “as is” basis. The author shall have neither liability nor responsibility to any person or entity with respect to any loss or damages arising from the information contained in this manual.
.NET, Windows, PowerShell, SmartScreen, Microsoft Office, Word, Excel, PowerPoint and Visual Studio are trademarks of Microsoft Corporation. All other trademarks are the property of their respective owners.