Create digital certificates in a few clicks: PFX files, certificates signed by your own root, certificates for a CSR (SSL / TLS), and certificates generated directly on a smart card or a USB token. The manual also shows how Windows stores certificates and private keys, how to create keys and CSRs with Windows tools, and how to generate the same certificates from C#, VB.NET and PowerShell.
1. What is X.509 Certificate Generator?
A digital certificate is an electronic identity card. It links a name (a person, a company, a web site, a program) to a public key, and it is signed by the issuer of the certificate. The matching private key stays secret with the owner and is used to sign documents, to sign code, to log on, or to protect a web connection (HTTPS).
Normally a certificate is issued by a Certification Authority (CA) that checks your identity. For tests, for internal use, for development and for training you need certificates that you create yourself, in seconds, with the exact options that you want. This is what X.509 Certificate Generator does. It contains two programs:
Program
Use it to...
PFX Certificate Generator
issue certificates saved in PFX files (certificate + private key, protected by a password): self-signed certificates, certificates signed by a root certificate that the program creates or that you load, and certificates for a CSR (SSL / TLS web certificates). It can also install the certificate in the Windows store.
Smart Card Certificate Generator
generate the key pair directly on a smart card, a USB token or in the Windows store (the private key never leaves the device) and install a self-signed certificate, or create a CSR for your certification authority and install the answer.
Both programs create RSA keys; PFX Certificate Generator also creates DSA and elliptic curve (ECDSA) keys, and Smart Card Certificate Generator creates ECDSA keys on the providers (KSP) that support them.
What these certificates are good for
A certificate that you issue yourself proves nothing to another person or computer, unless they install your root certificate and decide to trust it (section 8). Use these certificates for tests, for internal systems and for development. A certificate for the legal signature of documents is issued by a certification authority after the identification of the person.
Everything that the programs do is also available for programmers in the Signature Library (class X509CertificateGenerator), so you can create the same certificates from your own applications and scripts (section 14). The chapters about Windows (11 and 12) explain how to do by hand, with Windows tools, what the programs do for you: create keys in a provider, create a CSR, install the response and link the certificate to its private key.
2. Product installation
Requirements: Windows 10, Windows 11 or Windows Server 2016 or later (older systems with .NET Framework 4.8 also work) and Microsoft .NET Framework 4.8. Windows 10 (version 1903 and later) and Windows 11 already include it. For a smart card or a USB token you also need the driver (the “middleware”) of the device.
Run the installer and follow the steps. The two programs, PFX Certificate Generator and Smart Card Certificate Generator, appear in the Start menu.
Start a program. The title bar shows if the version is registered or not.
Demo version
The demo version has a single limitation: the certificates are valid at most 30 days and the common name of the certificate starts with [TEST]. After the registration (the registered version is delivered after the purchase) the limit disappears. The Signature Library works in the same way: without a serial number it writes This is a demonstration of the digital signature software and waits 10 seconds when a certificate is longer than 30 days.
3. Create your first certificate
In one minute you create a certificate that you can use to sign documents, e-mails or code on your computer.
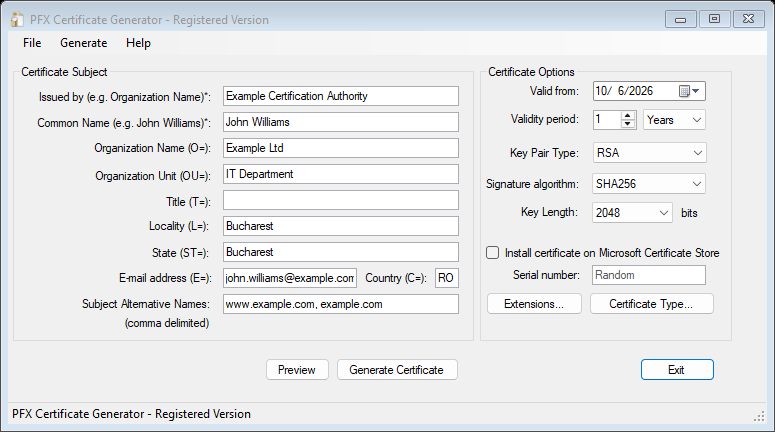
Start PFX Certificate Generator and fill the subject. Issued by is the name of the certification authority that signs the certificate (the program creates it for you) and Common Name is the name of the certificate owner: for example Example Certification Authority and John Williams.
PFX Certificate Generator. The fields marked with an asterisk are required.
Check the options. The defaults (RSA key of 2048 bits, SHA-256, one year) are good for most tests. Press Extensions... only if the certificate has a special purpose (section 6).
Press Generate Certificate. The program warns that a certificate you issue yourself is not trusted by other people. Press Yes.
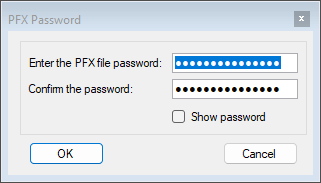
Choose the password of the PFX file twice (type it again to avoid a typing mistake) and the name of the file. Check Show password to see what you type.
The password protects the private key inside the PFX file. If you lose it, the file cannot be opened.
Done. The PFX file contains the certificate, its private key and the root certificate. Double-click it to install it in Windows (section 8), or give it to the program that must sign.
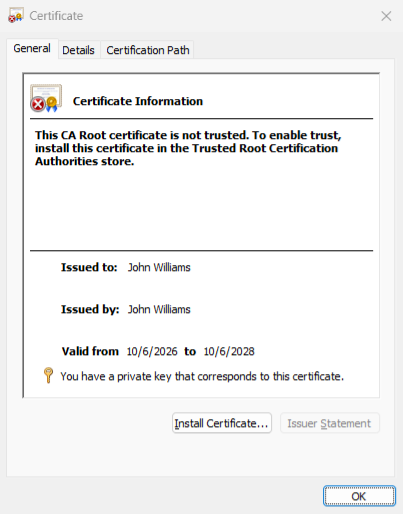
Press Preview instead of Generate Certificate to see the certificate in the standard Windows viewer without saving anything:
The certificate in the Windows viewer. Windows warns that the issuer is not trusted: a certificate you issued yourself is trusted only after its root is installed.
4. PFX Certificate Generator
4.1 The main window
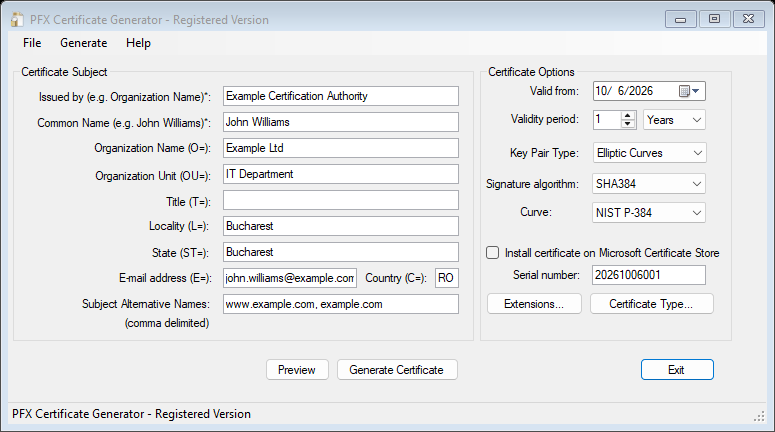
The main window with an elliptic curve key (NIST P-384) and a serial number.
Option
Meaning
Valid from, Validity period
The start of the validity and its length, in days, months or years. A certificate that starts today is valid from five minutes ago, so that it is not reported as “not yet valid” on a computer with a slower clock; a certificate that starts on another day starts at midnight.
Key Pair Type
The type of the key: RSA, DSA or Elliptic Curves (section 5).
Signature algorithm
The hash used to sign the certificate (SHA-256 is the default).
Key Length / Curve
The length of the RSA or DSA key, or the elliptic curve.
Install certificate on Microsoft Certificate Store
Also installs the certificate, with its private key, in the Personal store of the current user. For a standard certificate, the root certificate that signed it is installed in Trusted Root Certification Authorities; Windows asks you to confirm. (Hold the pointer over the checkbox for details.)
Serial number
The serial number of the certificate: a positive whole number. When the box is empty, a random 128-bit serial number is generated (recommended).
Extensions...
The key usages, the enhanced key usages, the templates, the path length and the certificate policies (section 6).
Certificate Type...
Who signs the certificate: a root created on the fly, the certificate itself, or a root that you load (section 7).
Preview, Generate Certificate
Show the certificate without saving it, or generate and save the PFX file.
While the keys are generated (several seconds for 4096 and 8192 bit keys) the window stays usable and a progress bar runs in the status bar; the buttons are disabled until the certificate is ready.
4.2 Subject and alternative names
The subject identifies the owner of the certificate. Only the Common Name (and the Issued by name, for a standard certificate) is required. The other fields are optional:
Field
Attribute
Example
Common Name
CN
John Williams (for a web server: the name of the site, www.example.com)
Organization Name, Organization Unit
O, OU
Example Ltd, IT Department
Title
T
Director
Locality, State
L, ST
Bucharest
E-mail address
E
john.williams@example.com
Country
C
RO (two letters, written in capitals by the program)
The values can contain Unicode characters (ä, Ñ, £...) and commas (Example, Inc.).
Subject Alternative Names are the other names of the certificate. A web certificate must contain the names of the site here, because the browsers ignore the Common Name. Write them separated by commas; the type of each name is detected from its value:
Value
Type
www.example.com
DNS name
192.168.1.10 or fe80::1
IP address (IPv4 or IPv6)
admin@example.com
E-mail address
https://www.example.com/
URI
4.3 Menus, Preview, certificate information
Menu
What it does
Generate > Preview Certificate
Creates the certificate and shows it in the Windows viewer. Nothing is saved or installed.
Generate > Generate Certificate...
The same as the button: creates and saves the PFX file.
Generate > Generate from CSR...
Signs a certificate request with a root certificate (section 9).
Generate > PFX Certificate Information...
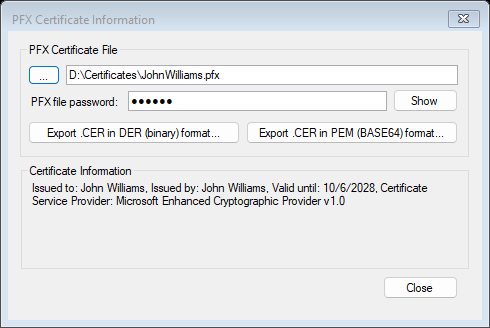
Opens a PFX file and shows the owner, the issuer and the validity date. You can open the certificate in the Windows viewer and export the public part (the .cer file) in the DER (binary) or PEM (Base64 text) format.
PFX Certificate Information: select the PFX file and type its password. The buttons are enabled when the file can be opened.
The .cer file contains only the public part: it is the file that you give to the people who must verify your signatures, or to the computers that must trust your root. The PFX file contains the private key too, and it must be kept secret.
5. Keys, algorithms and validity
A certificate contains the public key of a key pair. The type of the key and the hash algorithm decide how strong and how compatible the certificate is.
Key type
Sizes / curves
Use it when...
RSA
512, 1024, 2048 (default), 4096, 8192 bits
almost always: it works with every program (Windows, browsers, Office, PDF readers, signing tools). Use 2048 bits for user certificates and 4096 bits for a root. The 512 and 1024 bit sizes are obsolete and rejected by current validators; they are kept only for tests. A larger key needs more time to generate.
you want a short key with the same strength as a large RSA key (P-256 is comparable with RSA 3072), faster signatures, or the system that uses the certificate requires ECDSA. SHA-1 is not offered with ECDSA.
DSA
1024, 2048, 3072 bits
an old system requires DSA. A DSA key can only sign. Windows can verify the signature of a certificate only when it is DSA with SHA-1 (1024 bits), so the program proposes this combination; certificates with DSA and SHA-256 are valid (OpenSSL and Java verify them) but Windows reports Invalid algorithm specified.
Key usages and the type of the key
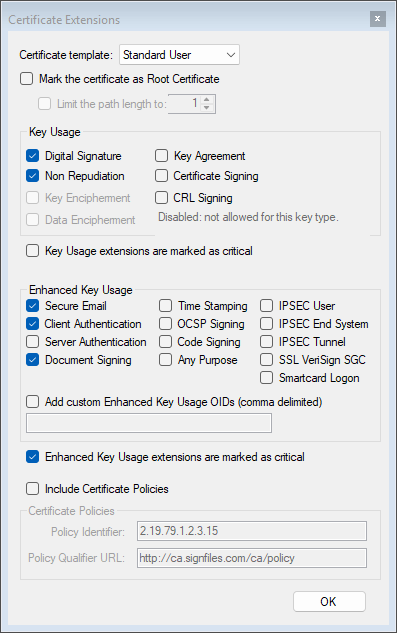
An ECDSA key cannot be used for Key Encipherment and Data Encipherment (RFC 5480), and a DSA key cannot be used for these and for Key Agreement either (RFC 3279). When you select ECDSA or DSA, the program disables these key usages in the Extensions window (they are grayed out) and restores them when you select RSA again, so that the default template works with every key type.
The hash of the signature
The Signature algorithm is the hash that is used when the issuer signs the certificate. Use SHA-256 (the default) or a stronger one (SHA-384, SHA-512). SHA-1 is no longer secure; use it only for an old system that cannot verify anything else. The algorithm of the signature (RSA, DSA or ECDSA) is decided by the key of the issuer: a certificate signed by an ECDSA root receives an ECDSA signature.
Validity
A certificate is valid only between two dates. After it expires, programs report it as expired and signatures made with it are no longer trusted (unless they were time stamped, section 13.1). The validity of a root certificate is usually long (10 years or more) and the validity of a user certificate is short (one to three years).
6. Extensions: key usage and templates
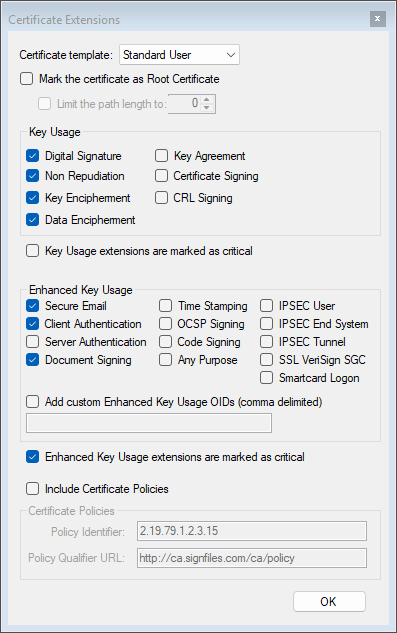
The extensions say what a certificate can be used for. Programs refuse a certificate whose usage does not fit their purpose, so the right extensions matter as much as the name. Press Extensions... to set them.
The Extensions window with the Standard User template.
Templates
Select a Certificate template and the checkboxes are set for you. You can change them afterwards.
Template
Key usage
Enhanced key usage
Use it for
Standard User
Digital Signature, Non Repudiation, Key Encipherment, Data Encipherment
to create digital signatures (documents, code, authentication).
Non Repudiation
for signatures that the owner cannot later deny (the legal signature of documents).
Key Encipherment
to transport keys (RSA key exchange, S/MIME encryption).
Data Encipherment
to encrypt data directly with the public key.
Key Agreement
to agree on a key (Diffie-Hellman).
Certificate Signing, CRL Signing
to sign other certificates and revocation lists: only for a CA certificate.
For a user, the usual usages are Digital Signature, Non Repudiation, Key Encipherment and Data Encipherment. For a root certificate they are Certificate Signing and CRL Signing. Key Usage extensions are marked as critical makes a program that does not understand the extension reject the certificate instead of ignoring it: use it for CA, time stamping and code signing certificates.
Enhanced key usage
The enhanced (extended) key usage names the purpose of the certificate by an OID. A program can require a purpose: a web browser asks for Server Authentication, a PDF reader for Document Signing or the e-mail client for Secure Email.
Purpose
OID
Meaning
Server Authentication
1.3.6.1.5.5.7.3.1
an SSL / TLS server
Client Authentication
1.3.6.1.5.5.7.3.2
log on to a server with a certificate
Code Signing
1.3.6.1.5.5.7.3.3
signing programs
Secure Email
1.3.6.1.5.5.7.3.4
S/MIME: signing and encrypting e-mail
Time Stamping
1.3.6.1.5.5.7.3.8
signing time stamps (RFC 3161)
OCSP Signing
1.3.6.1.5.5.7.3.9
signing OCSP answers
Smartcard Logon
1.3.6.1.4.1.311.20.2.2
logging on to Windows with a smart card
Document Signing
1.3.6.1.4.1.311.10.3.12
signing documents (Microsoft; used by Office and PDF)
Any Purpose
2.5.29.37.0
no restriction
If a purpose is not in the list, check Add custom Enhanced Key Usage OIDs and type the OIDs separated by commas. An OID that is not valid is reported before the certificate is generated. Enhanced Key Usage extensions are marked as critical works like the critical flag of the key usage.
Path length, certificate policies
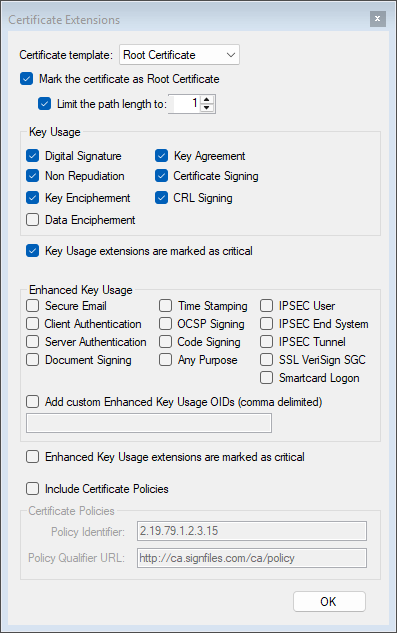
When the certificate is a CA (Mark the certificate as Root Certificate), you can limit its path length: the number of CA certificates that may follow it in a certification path. 0 means that the CA can issue only end-entity certificates (not other CAs).
The Root Certificate template, with the path length limited to 1.
Include Certificate Policies adds a policy identifier (an OID) and, optionally, the address of the Certification Practice Statement. If the OID or the address is not valid, the program reports the error instead of ignoring the policy.
With an elliptic curve key, Key Encipherment and Data Encipherment are disabled automatically.
7. Certificate types: root, self-signed, issued
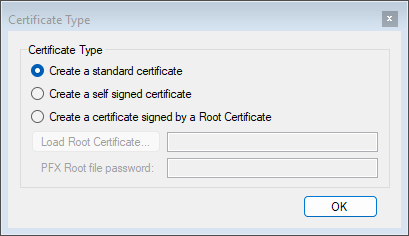
Press Certificate Type... to choose who signs the certificate.
Certificate Type.
Type
What the program does
Create a standard certificate
(default) Creates, on the fly, a root certificate named by the Issued by field and signs your certificate with it. The PFX file contains your certificate, its private key and the root certificate. The private key of the root is not saved: it is used once and discarded, so this root cannot issue other certificates later.
Create a self signed certificate
The certificate is signed with its own key: the issuer and the owner are the same. Simple, but every certificate is its own root.
Create a certificate signed by a Root Certificate
The certificate is signed by a root certificate (a PFX file) that you issued earlier. All the certificates that you issue have the same root: the computers that trust this root trust all of them.
An organization with its own root certificate
When you issue certificates for a whole organization (employees, servers, devices), create one root and sign every certificate with it. Then install the root, once, on the computers that must trust the certificates.
Issue the root certificate. Open Extensions..., select the Root Certificate template (it is marked as a CA and has the usages Certificate Signing and CRL Signing), set a long validity (10 years), a 4096 bit key, and a self-signed certificate type. Save the PFX file and remember its password; keep the file safe: whoever has it can issue certificates in your name.
Save the public part of the root (the .cer file). Open Generate > PFX Certificate Information..., select the PFX file and press Export .CER in DER format. This is the file that you distribute.
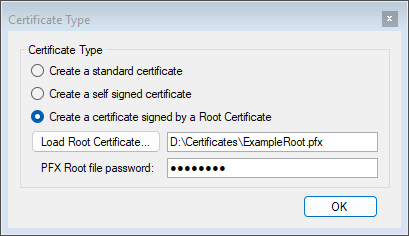
Issue a certificate signed by the root. Select the Standard User template, fill the subject, then in Certificate Type... select Create a certificate signed by a Root Certificate, load the root PFX file and type its password.
The root PFX file and its password.
Install the root on every computer that must trust the certificates (section 8).
8. Install the certificate and make it trusted
A certificate is valid when its dates, its signature and its usage are correct. It is trusted only when it is signed by a root that the computer trusts. The programs do not decide this: Windows decides, by the certificate that is installed in the store Trusted Root Certification Authorities. A certificate that you issued is therefore reported as “not trusted” until its root is installed.
Install a PFX certificate (to sign with it)
Double-click the PFX file. Keep Current User and press Next.
Type the password of the PFX file. Leave Mark this key as exportable unchecked, unless you need to export the key later.
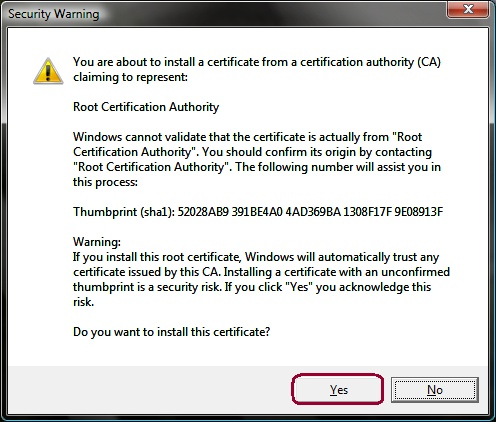
Leave the automatic selection of the store (Personal). When Windows asks about the root certificate, press Yes:
Windows asks for a confirmation before it trusts a root certificate. Check the thumbprint, then press Yes.
The certificate is now in the Personal store of the current user and every program of that user (Word, Acrobat, signing tools...) can use it. The same result is obtained with the checkbox Install certificate on Microsoft Certificate Store of the program, or from PowerShell with Import-PfxCertificate (section 11.4).
Make the certificates trusted on another computer
Copy the .cer file of the root (never the PFX) to the computer, and install it in the Trusted Root Certification Authorities store:
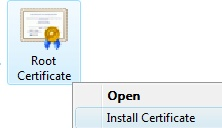
Right-click the .cer file and select Install Certificate.
The context menu of the .cer file.
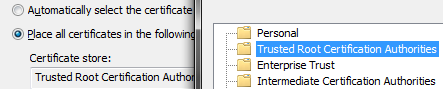
Select Place all certificates in the following store, press Browse and select Trusted Root Certification Authorities.
The Trusted Root Certification Authorities store.
Press Finish and, when Windows asks, Yes.
Trust only a root that you control
When you install a root, Windows trusts all the certificates that it issues. Install only your own root, and never a certificate of unknown origin. To trust it for all the users of the computer use certlm.msc (Local Computer); for the computers of a domain, an administrator can distribute the root with a Group Policy.
Export a certificate from the Windows store
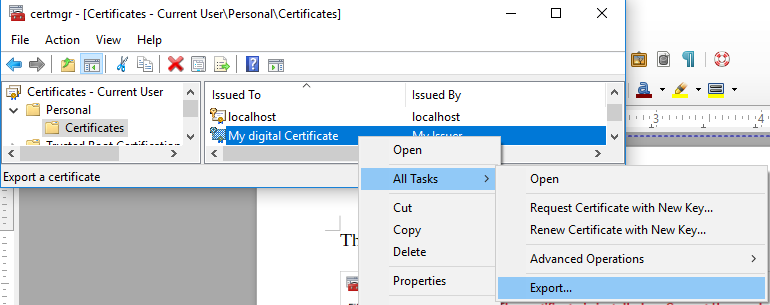
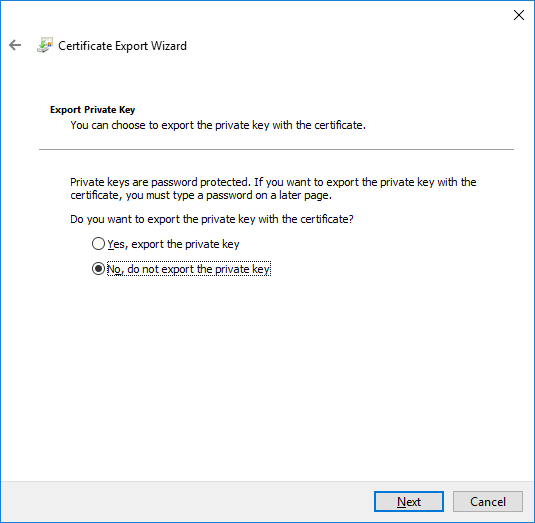
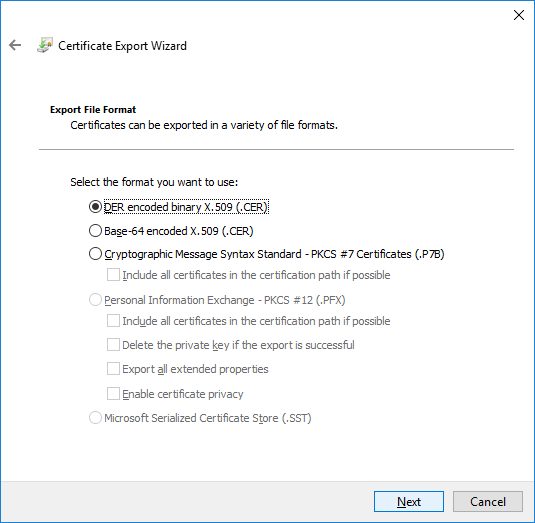
To get the .cer file of a certificate that is already in the store (for example the root), open the store (certmgr.msc, section 11.1), select the certificate and press Export. Choose No, do not export the private key and the format DER encoded binary X.509 (.CER) or Base-64 encoded X.509 (the PEM format).
Select the certificate > All Tasks > Export.Do not export the private key when you export a root for distribution.The formats: DER (.cer), Base-64 (PEM), PKCS #7 and, with the private key, PFX.
9. Certificates for a CSR (SSL / TLS)
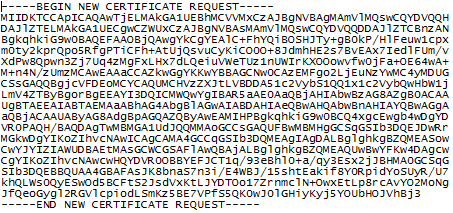
A Certificate Signing Request (CSR) is a message that asks a certification authority to issue a certificate. It contains the name of the applicant and his public key, and it is signed with the private key that stays with the applicant. The CA signs it and returns the certificate: the private key never travels. This is how SSL / TLS certificates for web sites are issued. The standard format of a CSR is PKCS#10, saved as text (PEM): -----BEGIN CERTIFICATE REQUEST----- or -----BEGIN NEW CERTIFICATE REQUEST-----.
PFX Certificate Generator can act as the certification authority: it signs a CSR with your root certificate. The whole procedure for an IIS web site is:
Issue the root certificate and install its public part on the computers that browse the site (section 7, section 8).
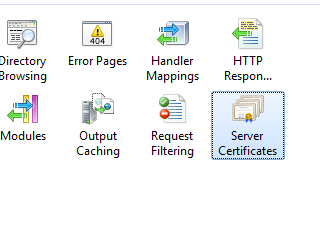
Create the CSR on the web server. In IIS Manager select the server, open Server Certificates and press Create Certificate Request...IIS Manager > Server Certificates.
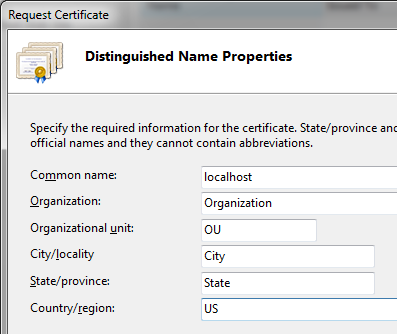
Type the data of the site. The Common Name must be the name of the site (www.example.com). Choose the cryptographic provider and a bit length of 2048, and save the request as a text file (for example c:\CSR.txt).
The distinguished name of the request.The CSR is a text file.
Sign the CSR with PFX Certificate Generator.
In Extensions... select the SSL Certificate template.
Write the names of the site in Subject Alternative Names (www.example.com, example.com), because a browser ignores the Common Name of the CSR and checks these names. The Subject and the public key come from the CSR; the validity, the extensions and the hash come from the window.
In Certificate Type... select Create a certificate signed by a Root Certificate and load your root PFX file.
Select Generate > Generate from CSR..., select the CSR file and save the resulting .cer file (for example c:\resp.cer).
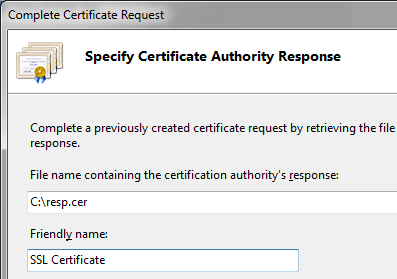
Install the response on the server. In IIS Manager select Complete Certificate Request..., select the .cer file, type a friendly name and press OK. Then bind the certificate to the site (Bindings > https).
Complete Certificate Request.
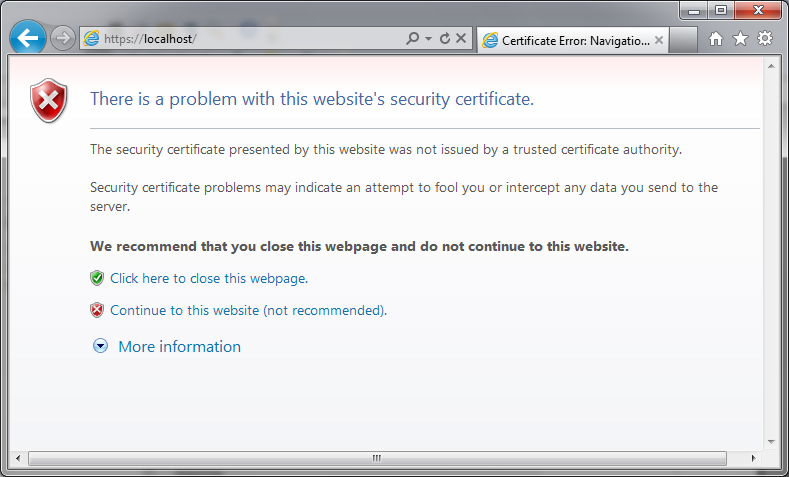
Check the site. A browser on a computer that does not trust your root shows a warning:
The certificate is valid but its root is not trusted yet.
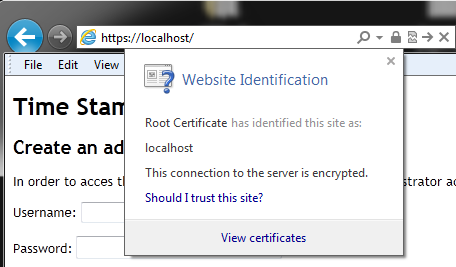
After the root is installed in Trusted Root Certification Authorities (section 8) on every computer that opens the site, the warning disappears.
The site with a trusted certificate.
The CSR does not have to come from IIS
Any PKCS#10 request works: from OpenSSL, from Linux web servers, from a printer or a network device, from certreq, from a smart card (section 10.3) or from your own program (section 12). The CSR is checked: the program verifies its signature (proof that the applicant owns the private key) and refuses a request that is damaged. Key usages that the key cannot have (for example Key Encipherment for an ECDSA key) are refused too.
10. Smart Card Certificate Generator
A smart card or a USB token keeps the private key inside a chip: the key is generated there and it never leaves the device, so nobody can copy it. Smart Card Certificate Generator generates the key pair on the device (or on any provider of Windows), creates a certificate and installs it, or creates a certificate request (CSR) for your certification authority.
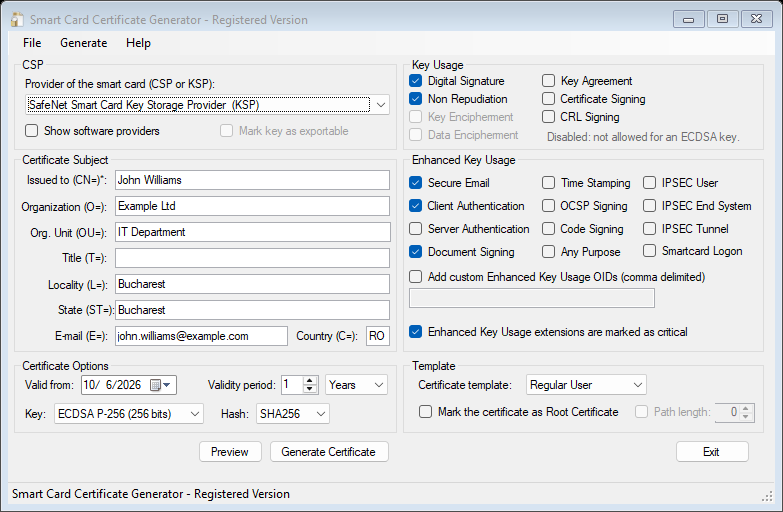
Smart Card Certificate Generator. The provider is a smart card KSP and the key is ECDSA P-256; the encipherment key usages are disabled automatically.
10.1 CSP and KSP providers
Windows talks to a smart card through a cryptographic provider. There are two kinds, and the program lists both:
Provider
Name in the list
Details
CSP
the name of the provider, for example eToken Base Cryptographic Provider, Microsoft Base Smart Card Crypto Provider
The old CryptoAPI provider. Only RSA keys. The key has a key spec (the program uses Key Exchange, the usual choice for certificates).
KSP (Key Storage Provider)
the name followed by (KSP), for example SafeNet Smart Card Key Storage Provider (KSP), Microsoft Smart Card Key Storage Provider (KSP)
The modern CNG provider. RSA and, when the card supports them, ECDSA keys (P-256, P-384, P-521). Most smart card drivers of the last years (the “minidriver”) provide a KSP.
By default the list contains only the providers of hardware devices (smart cards, tokens, TPM). Check Show software providers to see the providers of Windows that keep the key in the user profile (for example Microsoft Software Key Storage Provider); a certificate created there is a normal certificate of the Windows store, without a card.
Providers that cannot create RSA keys (DSS, Diffie-Hellman) are not listed.
The list Key offers only the keys that the selected provider can create. Insert the card before you start the program: a provider reports what the card in the reader supports. For example, a SafeNet card in our tests allowed RSA 2048 and ECDSA P-256 / P-384 on the KSP, and RSA 2048 on the CSP.
The key of a smart card cannot be exported, so Mark key as exportable is available only for software providers.
CSP or KSP?
For the same card, the two providers use the same physical key store. Use the KSP when you need ECDSA keys or when the programs that will use the certificate are modern (Windows 10/11, browsers). Use the CSP for old programs that only know CryptoAPI. Both were tested with a SafeNet smart card: the certificate generated through the CSP is bound to the eToken Base Cryptographic Provider and signs with SHA-256 through CryptoAPI; the one generated through the KSP is bound to the SafeNet Smart Card Key Storage Provider.
10.2 Generate a certificate on the card
Insert the smart card or the token and start the program.
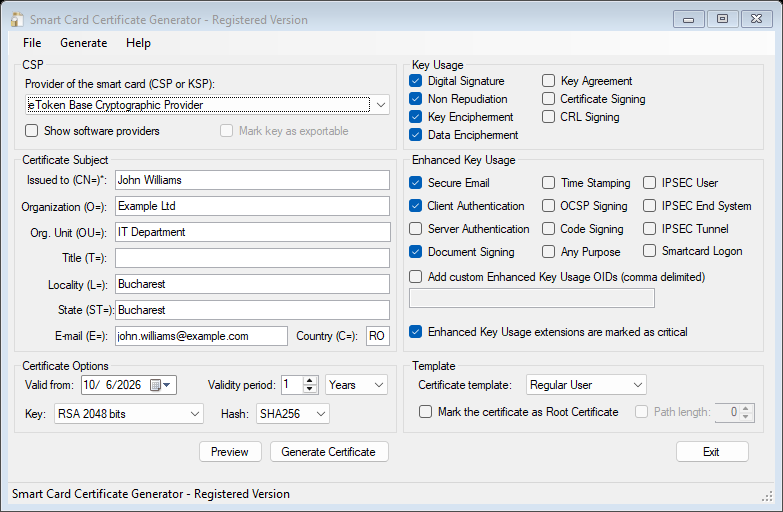
Select the provider of the card (CSP group) and the key (RSA 2048, ECDSA P-256...) and the hash (SHA-256 is the default; SHA-1 is not offered for ECDSA).
The same program with a CSP provider and an RSA key.
Fill the subject (Issued to (CN=) is required) and select a template: Regular User, Root Certificate, Time Stamping or Code Signing. The key usages and the enhanced key usages are the same as in section 6; the validity and the dates work as in PFX Certificate Generator. For a CA certificate check Mark the certificate as Root Certificate and, if you want, Path length.
Check that the card has enough free space for a key and a certificate.
Press Generate Certificate. Windows asks for the PIN of the card; generating the key can take several seconds (even more than 20 seconds for RSA), and the program stays usable. The certificate is signed with its own key (self-signed) and it is installed on the card and in the Personal store of the current user. The name that Windows shows for the certificate is the Common Name.
Preview shows how the certificate will look (the library creates a certificate with the same settings), but it does not use the card.
The program checks all the settings before it creates the key. If a step fails after the key was created and the certificate was not installed, the program deletes that key, so that failed attempts do not fill the card.
A card is a device with a PIN: a wrong PIN is counted by the card, and after a few mistakes (usually 3 to 15, depending on the card) the card is blocked and only the administrator PIN (PUK) of the manufacturer can unblock it. If Windows tells you that the PIN is wrong, stop and check it.
The serial number of the certificate cannot be set here: Windows generates a random one.
10.3 Request and response (CSR)
To get a certificate from a certification authority (your own, created with PFX Certificate Generator or a public one), generate the key on the card and send the request:
Fill the subject, the key and the extensions as above, then select Generate > Generate PKCS#10 Certificate Request (CSR)....
Choose the file of the request (.csr). Windows asks for the PIN and the key is created on the card. The request waits in the Request store of the current user (it is the link between the key and the answer): do not delete it.
Send the .csr file to the CA. Your own CA signs it with Generate > Generate from CSR... in PFX Certificate Generator (section 9).
When you receive the certificate, select Generate > Install PKCS#10 CA Response... and select the file. The program accepts the formats that a CA returns: a .cer or .crt (DER or text), a .pem and a PKCS#7 file (.p7b, .p7c) with the whole chain. The certificate is written on the card and linked to its key.
All these operations were tested with a SafeNet smart card: RSA 2048 (CSP and KSP), ECDSA P-256 and P-384 (KSP), self-signed certificates and CSRs, with the response installed from a DER, a PEM and a PKCS#7 file; every key was used to sign and the signature was verified.
11. Windows certificate stores and private keys
The certificates that you create must end in a place where the programs find them. This chapter explains how Windows stores certificates and keys, and shows how to see and repair the link between a certificate and its private key. Everything here is standard Windows, it works with certificates from any source.
11.1 Stores and certmgr
Windows keeps the certificates in stores, in two locations:
Location
Open it with
For
Current User
certmgr.msc
the certificates of the signed in user: his signing certificates, the certificates trusted only by him
Local Computer (Local Machine)
certlm.msc (as administrator)
the certificates of the computer and of the services (IIS, the services that run under a service account), the roots trusted by all the users
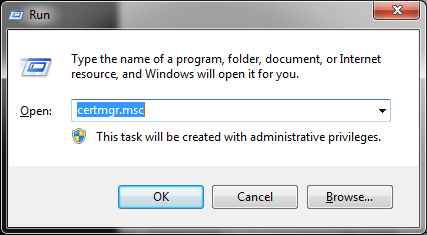
Start > Run > certmgr.msc.
The most used stores:
Store
Contains
Personal (My)
the certificates that have a private key and that you use to sign, to log on or to encrypt
Trusted Root Certification Authorities (Root)
the root certificates that Windows trusts
Intermediate Certification Authorities (CA)
the certificates of the CAs between a root and a user certificate
Trusted Publishers
the signers of code that are trusted
Certificate Enrollment Requests (REQUEST)
the certificate requests that wait for the answer of a CA
A copy in “Intermediate Certification Authorities”
When Windows installs a certificate that it cannot link to a trusted root (a self-signed certificate that you created), it may also keep a copy of it in the Intermediate Certification Authorities store. It is a normal behaviour of Windows and it does not make the certificate trusted. You can delete the copy; it does not change the certificate in Personal.
11.2 Keys, providers and key mapping
A certificate in the Personal store is only useful if Windows knows where its private key is. The link is written in the certificate as a property (key provider information): the provider (for example Microsoft Software Key Storage Provider or SafeNet Smart Card Key Storage Provider) and the key container (the name of the key inside the provider). When the link is missing, Windows shows the certificate without the small key icon, and the programs say that the certificate has no private key.
The link exists when:
you install a PFX file: Windows imports the key in a provider and links the certificate to it;
you complete a request (certreq -accept, Complete Certificate Request in IIS, Install PKCS#10 CA Response in Smart Card Certificate Generator): the key was created by the request, and the response is linked to it;
you generate the certificate with New-SelfSignedCertificate, or with Smart Card Certificate Generator.
The link is missing when you import only the .cer file (the public part), when you copy a certificate from another store, or when you delete and add the certificate again. The key can still exist in the provider: the link can be rebuilt, as shown below.
See where the key is: certutil
certutil -user -store my lists the certificates of the Personal store, with their key container and provider:
certutil -user -store my "John Smith"
Serial Number: 336432963e0f64f3c2dffeb591e09df1
Subject: CN=John Smith, O=Example, Ltd, C=RO
  Key Container = tp-cfddba61-af1d-44b4-b66b-81e9a6f2bd90
  Provider = Microsoft Software Key Storage Provider
Private key is NOT exportable
Encryption test passed
CertUtil: -store command completed successfully.
Encryption test passed means that Windows found the key and that it works. For a certificate without link, the line No key provider information appears instead of the key container.
The keys that a provider holds are listed with -csp ... -key:
Every container is listed with its algorithm (RSA, ECDSA_P384...) and, for a CSP, its key spec (AT_KEYEXCHANGE for a key that can sign and encrypt, AT_SIGNATURE for a signing key). Notice that a smart card is seen both by its CSP and by its KSP, with the same containers.
A key that is not needed any more is deleted with -delkey (careful: a deleted key cannot be recovered, and the certificates that use it stop working):
Link a certificate to its key: -addstore and -repairstore
If you have the certificate (.cer) and the key is still in the provider (it was created by a request, or the certificate was deleted from the store but not its key), you can rebuild the link. This is also the way to use a certificate that was issued by a CA that is not trusted on the computer, because certreq -accept refuses such a certificate (0x800b010a CERT_E_CHAINING: a certificate chain could not be built to a trusted root authority).
rem 1. add the certificate (the public part) to the Personal store of the current user
certutil -user -addstore my "d:\certificate.cer"

rem 2. link it to the private key that has the same public key (the serial number is in the .cer file; it is also displayed by -store)
certutil -user -repairstore my "336432963e0f64f3c2dffeb591e09df1"
Result on a test computer, with the certificate that was deleted from the store and added again:
> certutil -user -delstore my 336432963e0f64f3c2dffeb591e09df1
CertUtil: -delstore command completed successfully.        (the key stays in the provider)

> certutil -user -addstore my js.cer
CertUtil: -addstore command completed successfully.
> certutil -user -store my 336432963e0f64f3c2dffeb591e09df1
Subject: CN=John Smith, O=Example, Ltd, C=RO
No key provider information

> certutil -user -repairstore my 336432963e0f64f3c2dffeb591e09df1
  Key Container = tp-cfddba61-af1d-44b4-b66b-81e9a6f2bd90
  Provider = Microsoft Software Key Storage Provider
Encryption test passed
CertUtil: -repairstore command completed successfully.
-repairstore searches the providers for the key that matches the certificate and writes the link. For a certificate on a smart card or an HSM the card must be inserted and Windows can ask for the PIN. Once the link is rebuilt, the certificate is ready to be used. (-repairstore may choose another provider than the one that created the key, for example Microsoft Enhanced Cryptographic Provider v1.0 for a key created with the RSA and AES provider: it is the same key.)
11.3 Current User and Local Machine
A program that runs under another account than yours does not see your Current User store. This is the case of IIS, of the Windows services and of the scheduled tasks. A certificate that is visible in your certmgr.msc and not found by the service is the most common problem. The solutions:
Install the certificate in the Local Computer store (certlm.msc, Personal), with an administrator account. When you import a PFX file select Local Machine. Give the account of the service the right to use the private key (All Tasks > Manage Private Keys in certlm.msc).
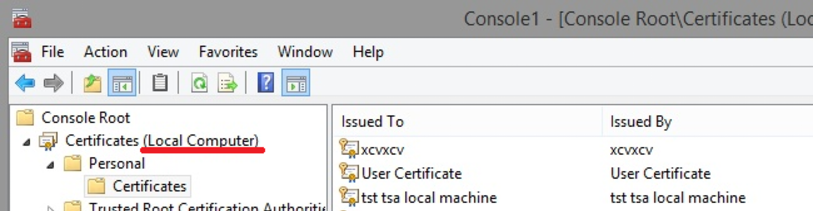
An mmc console with the snap-in Certificates (Local Computer): mmc > Add/Remove Snap-in > Certificates > Computer account.
Run the service under your account (or, for IIS, change the identity of the Application Pool, or use ASP.NET Impersonation with the user who owns the certificate), so that it sees the Current User store. The certificate must have been issued for that account: a certificate created in another Windows account cannot be used.
Copy a certificate from Current User to Local Computer when the key is on a smart card or an HSM and cannot be exported as a PFX. This is the sequence that works for such certificates:
rem 1. In certmgr.msc (Current User) export the public part of the certificate to d:\certificate.cer and read its serial number
rem    (open d:\certificate.cer, the Details tab, e.g. 4e54c00056bbbff410)

rem 2. In a Command Prompt run as Administrator: import the public part in the Local Computer store (no key yet)
certutil -addstore -f "My" "d:\certificate.cer"

rem 3. Link the certificate to the key of the smart card / HSM (enter the PIN if Windows asks)
certutil -repairstore my "4e54c00056bbbff410"
After step 2 the certificate is imported without the reference to the private key; after step 3 the reference exists and the certificate is ready to be used from the Local Computer store.
Smart cards and services
A smart card or a USB token asks for a PIN in a window, and a service cannot answer it. Besides, most middleware of tokens does not work in the session of a service. If a service must sign with a certificate on a hardware device, use an HSM that has no PIN prompt for the service (partition activated, PED / administrator PIN disabled) or access the device through PKCS#11. Certificates on ordinary smart cards and USB tokens are meant for interactive use.
11.4 PowerShell and certutil
The common operations, from the command line (no administrator rights are needed for the Current User store):
# import a PFX file in the Personal store of the current user (the key is not exportable)
Import-PfxCertificate -FilePath d:\certificate.pfx -CertStoreLocation Cert:\CurrentUser\My -Password (ConvertTo-SecureString "123456" -AsPlainText -Force)

# the same in the Local Computer store (as administrator)
Import-PfxCertificate -FilePath d:\certificate.pfx -CertStoreLocation Cert:\LocalMachine\My -Password (ConvertTo-SecureString "123456" -AsPlainText -Force)

# import a root certificate (.cer) in the Trusted Root Certification Authorities store; Windows asks for a confirmation for the Current User
Import-Certificate -FilePath d:\root.cer -CertStoreLocation Cert:\CurrentUser\Root

# list the certificates that have a private key, with the thumbprint and the end of the validity
Get-ChildItem Cert:\CurrentUser\My | Where-Object { $_.HasPrivateKey } | Format-Table Subject, Thumbprint, NotAfter -AutoSize

# export the public part, or the whole certificate with its key (only if the key is exportable)
Export-Certificate -Cert (Get-Item Cert:\CurrentUser\My\<thumbprint>) -FilePath d:\certificate.cer
Export-PfxCertificate -Cert (Get-Item Cert:\CurrentUser\My\<thumbprint>) -FilePath d:\certificate.pfx -Password (ConvertTo-SecureString "123456" -AsPlainText -Force)

# delete a certificate and its private key
Remove-Item Cert:\CurrentUser\My\<thumbprint> -DeleteKey
The Cert: drive is the certificate store: Cert:\CurrentUser\My (Personal), Cert:\CurrentUser\Root (Trusted Root), Cert:\LocalMachine\My (the computer). Import-PfxCertificate and Import-Certificate exist in Windows PowerShell 5.1 and in PowerShell 7 on Windows. The same operations in C# are in section 14.1.
12. Create keys and CSRs with Windows tools
You do not need a special program to create a key and a certificate request: Windows can do it. The three ways below create the key in the provider that you choose (software, smart card, token, TPM), create the CSR that you send to your certification authority and install the answer. The result is the same as the one of Smart Card Certificate Generator.
12.1 certreq
certreq creates the request from a text file (.inf). The provider is chosen by ProviderName: a KSP (CNG) for modern keys, a CSP (CryptoAPI) with its ProviderType for the old ones.
An RSA key of 2048 bits in a KSP, with the alternative names of a web site:
An ECDSA key (the curve is given by the algorithm name and by the length), and a key in an old CSP:
; the lines that change for an ECDSA key
KeyAlgorithm = ECDSA_P256          ; ECDSA_P384, ECDSA_P521
KeyLength = 256                    ; 384, 521
ProviderName = "Microsoft Software Key Storage Provider"

; the lines that change for a key in a CSP (CryptoAPI)
KeyAlgorithm = RSA
KeySpec = 1                        ; 1 = AT_KEYEXCHANGE, 2 = AT_SIGNATURE
ProviderName = "Microsoft Enhanced RSA and AES Cryptographic Provider"
ProviderType = 24                  ; 1 = RSA, 24 = RSA AES
KeyUsage = 0xA0                    ; digital signature + key encipherment
For the key on a smart card use the name of its provider, for example ProviderName = "SafeNet Smart Card Key Storage Provider": Windows asks for the PIN when the key is created. Then:
rem create the key and the request (the private key stays in the provider)
certreq -new request.inf request.csr

rem ... send request.csr to the certification authority; it returns certificate.cer ...

rem install the certificate and link it to the key (the CA must be trusted on this computer)
certreq -accept -user certificate.cer
CertReq: Request Created
(request.csr starts with -----BEGIN NEW CERTIFICATE REQUEST-----)
certreq -accept needs a trusted CA
certreq -accept refuses a certificate whose root is not trusted on the computer (error 0x800b010a, CERT_E_CHAINING): install the root first (section 8) or link the certificate with certutil -addstore and certutil -repairstore (section 11.2), which does not check the trust. The Install PKCS#10 CA Response command of Smart Card Certificate Generator and the CertEnroll objects below accept an untrusted CA when you ask for it.
Use -user with certreq -accept when the request was created for the current user (MachineKeySet = FALSE); for the computer use MachineKeySet = TRUE and an administrator prompt. certreq -new keeps a copy of the request in the Certificate Enrollment Requests store until the answer is installed.
The same request can be created from a script. PowerShell example that prepares the files for the three providers and installs the answer, tested with the software provider:
# 1. the request: the INF file selects the provider of the key (a KSP here; use the name of the provider of your smart card to create the key on the card)
$inf = @'
[Version]
Signature = "$Windows NT$"

[NewRequest]
Subject = "CN=Ana Popescu, O=Example Ltd, C=RO"
KeyAlgorithm = RSA
KeyLength = 2048
ProviderName = "Microsoft Software Key Storage Provider"
Exportable = FALSE
MachineKeySet = FALSE
KeyUsage = 0x80
HashAlgorithm = SHA256
RequestType = PKCS10
'@
Set-Content -Path "$PSScriptRoot\certreq.inf" -Value $inf -Encoding ASCII
certreq -new -q "$PSScriptRoot\certreq.inf" "$PSScriptRoot\certreq.csr"      # the private key is created in the provider
Write-Host (Get-Content "$PSScriptRoot\certreq.csr" -First 1)

# ... the certification authority signs certreq.csr and returns certreq-issued.cer ...

# 2. install the answer.
#    If the CA is trusted on this computer:       certreq -accept -user "$PSScriptRoot\certreq-issued.cer"
#    If it is not (a CA of your own), link the certificate to the key with certutil:
$issued = New-Object System.Security.Cryptography.X509Certificates.X509Certificate2("$PSScriptRoot\certreq-issued.cer")
certutil -user -addstore my "$PSScriptRoot\certreq-issued.cer" | Out-Null
certutil -user -repairstore my $issued.SerialNumber | Out-Null

$installed = Get-ChildItem Cert:\CurrentUser\My | Where-Object { $_.Thumbprint -eq $issued.Thumbprint }
Write-Host ("Installed: " + $installed.Subject + ", private key: " + $installed.HasPrivateKey)

# remove the test certificate with its key (and the pending request)
Remove-Item "Cert:\CurrentUser\My\$($issued.Thumbprint)" -DeleteKey
Get-ChildItem Cert:\CurrentUser\REQUEST | Where-Object { $_.Subject -eq $issued.Subject } | ForEach-Object { Remove-Item "Cert:\CurrentUser\REQUEST\$($_.Thumbprint)" }
12.2 CertEnroll (PowerShell and C#)
CertEnroll is the COM interface that Windows uses for enrollment, and the one used by Smart Card Certificate Generator. It creates the key in any CSP or KSP, sets the key options and creates the request. The objects are available from PowerShell (New-Object -ComObject), from C# (with dynamic, without any reference except Microsoft.CSharp) and from VBScript.
# a key and a certificate request (CSR) created in a Windows provider (CertEnroll COM objects)
$provider = "Microsoft Software Key Storage Provider"     # a KSP. The provider of a smart card: "SafeNet Smart Card Key Storage Provider", "Microsoft Smart Card Key Storage Provider"
$providerType = 0                                          # 0 = KSP; for a CSP its type (1 = RSA, 24 = RSA AES)

$key = New-Object -ComObject X509Enrollment.CX509PrivateKey
$key.ProviderName = $provider
$key.ProviderType = $providerType
$key.Length = 2048                                         # for ECDSA: set $key.Algorithm (see below) and the length 256, 384 or 521
$key.KeySpec = if ($providerType -eq 0) { 0 } else { 1 }  # 0 = none (KSP), 1 = AT_KEYEXCHANGE (CSP)
$key.KeyUsage = 0xFFFFFF                                   # XCN_NCRYPT_ALLOW_ALL_USAGES
$key.MachineContext = $false                               # the key of the current user ($true: the computer)
$key.ExportPolicy = 0                                      # 0 = the key cannot be exported (1 = can be exported)
$key.Create()                                              # a smart card asks for the PIN here

# for an ECDSA key (KSP only), before Create(): the curve is given by the name of the algorithm
#   $oid = New-Object -ComObject X509Enrollment.CObjectId
#   $oid.InitializeFromAlgorithmName(3, 0, 0, "ECDSA_P256")      # 3 = public key algorithms
#   $key.Algorithm = $oid; $key.Length = 256

$subject = New-Object -ComObject X509Enrollment.CX500DistinguishedName
$subject.Encode('CN="Ana Popescu", O="Example, Ltd", C=RO', 0)    # the values between quotes can contain commas

$request = New-Object -ComObject X509Enrollment.CX509CertificateRequestPkcs10
$request.InitializeFromPrivateKey(1, $key, "")             # 1 = the context of the current user
$request.Subject = $subject

$hash = New-Object -ComObject X509Enrollment.CObjectId
$hash.InitializeFromAlgorithmName(1, 0, 0, "SHA256")       # 1 = hash algorithms
$request.HashAlgorithm = $hash

$usage = New-Object -ComObject X509Enrollment.CX509ExtensionKeyUsage
$usage.InitializeEncode(0x80)                              # 0x80 = digital signature, 0x20 = key encipherment, 0x40 = non repudiation
$request.X509Extensions.Add($usage)

$enrollment = New-Object -ComObject X509Enrollment.CX509Enrollment
$enrollment.InitializeFromRequest($request)
$csr = $enrollment.CreateRequest(3)                        # 3 = PEM, with the header NEW CERTIFICATE REQUEST
Set-Content -Path "$PSScriptRoot\ps-request.csr" -Value $csr -Encoding ASCII
Write-Host ($csr -split "`n")[0]

# ... the certification authority returns ps-issued.cer. Installing it links it to the key (the request waits in the REQUEST store):
$accept = New-Object -ComObject X509Enrollment.CX509Enrollment
$accept.Initialize(1)
$data = [System.IO.File]::ReadAllBytes("$PSScriptRoot\ps-issued.cer")
$isText = -not ($data | Where-Object { $_ -ne 9 -and $_ -ne 10 -and $_ -ne 13 -and ($_ -lt 32 -or $_ -ge 127) })
$response = if ($isText) { [System.Text.Encoding]::ASCII.GetString($data) } else { [Convert]::ToBase64String($data) }
$accept.InstallResponse(2, $response, 6, "")               # 2 = accept an untrusted CA too, 6 = base64 with or without header
Write-Host "Installed in the Personal store of the current user"
The same in C#. Create a console project for .NET Framework 4.8 and add the reference Microsoft.CSharp (needed by dynamic):
// a key and a certificate request (CSR) created by the Windows enrollment objects (CertEnroll). Unlike CngKey, it works with the legacy
// CSPs too (CryptoAPI) and it sets the key spec; the objects are used without a reference, with "dynamic"
string provider = "Microsoft Software Key Storage Provider";        // a KSP: ProviderType 0. A CSP: its name and its type (1 = RSA, 24 = RSA AES)
int providerType = 0;

dynamic key = Activator.CreateInstance(Type.GetTypeFromProgID("X509Enrollment.CX509PrivateKey"));
key.ProviderName = provider;
key.ProviderType = providerType;
key.Length = 2048;
key.KeySpec = providerType == 0 ? 0 : 1;                // 0 = none (KSP), 1 = AT_KEYEXCHANGE (CSP)
key.KeyUsage = 0xFFFFFF;                                // XCN_NCRYPT_ALLOW_ALL_USAGES
key.MachineContext = false;                             // the key of the current user
key.ExportPolicy = 0;                                   // not exportable (1 = exportable)
key.Create();                                           // a smart card asks for the PIN here

dynamic subject = Activator.CreateInstance(Type.GetTypeFromProgID("X509Enrollment.CX500DistinguishedName"));
subject.Encode("CN=\"John Smith\", O=\"Example, Ltd\", C=RO", 0);        // a value with a comma, between quotes

dynamic request = Activator.CreateInstance(Type.GetTypeFromProgID("X509Enrollment.CX509CertificateRequestPkcs10"));
request.InitializeFromPrivateKey(1, key, "");           // 1 = the context of the current user
request.Subject = subject;

dynamic hash = Activator.CreateInstance(Type.GetTypeFromProgID("X509Enrollment.CObjectId"));
hash.InitializeFromAlgorithmName(1, 0, 0, "SHA256");   // 1 = the group of the hash algorithms (3 = public key algorithms)
request.HashAlgorithm = hash;

dynamic usage = Activator.CreateInstance(Type.GetTypeFromProgID("X509Enrollment.CX509ExtensionKeyUsage"));
usage.InitializeEncode(0x80);                           // digital signature
request.X509Extensions.Add(usage);

dynamic enrollment = Activator.CreateInstance(Type.GetTypeFromProgID("X509Enrollment.CX509Enrollment"));
enrollment.InitializeFromRequest(request);
string csr = enrollment.CreateRequest(3);               // 3 = PEM with the header NEW CERTIFICATE REQUEST
File.WriteAllText("enroll-request.csr", csr);
Console.WriteLine(csr.Split('\n')[0].Trim());
When the certification authority returns the certificate (enroll-issued.cer), accept it. The enrollment object finds the pending request by the public key of the certificate:
// the certification authority signed the request and returned enroll-issued.cer. Installing it links the certificate to the key
// that created the request (the enrollment object finds the pending request in the REQUEST store of the user)
dynamic accept = Activator.CreateInstance(Type.GetTypeFromProgID("X509Enrollment.CX509Enrollment"));
accept.Initialize(1);                                                     // 1 = the context of the current user
// the response can be a binary (DER) file or a text (PEM / base64) file: a text file is used as it is, a binary one is converted to base64
byte[] data = File.ReadAllBytes("enroll-issued.cer");
bool isText = data.All(c => c == 9 || c == 10 || c == 13 || (c >= 32 && c < 127));
string response = isText ? Encoding.ASCII.GetString(data) : Convert.ToBase64String(data);

accept.InstallResponse(2, response, 6, "");                                // 2 = also accept an untrusted CA, 6 = base64 with or without header
Console.WriteLine("Installed in the Personal store of the current user");
Values of the CertEnroll constants
Constant
Values
Context (InitializeFromPrivateKey, Initialize)
1 = current user, 2 = local computer
Output encoding (CreateRequest, InstallResponse)
0 = PEM with the header CERTIFICATE, 1 = base64 without header, 2 = binary, 3 = PEM with the header NEW CERTIFICATE REQUEST, 6 = base64 with or without header (any)
Restrictions of InstallResponse
0 = none, 1 = allow a response without a pending request, 2 = allow an untrusted certificate, 4 = allow an untrusted root
Object identifier group (CObjectId.InitializeFromAlgorithmName)
0x80 = digital signature, 0x40 = non repudiation, 0x20 = key encipherment, 0x10 = data encipherment, 0x08 = key agreement, 0x04 = certificate signing, 0x02 = CRL signing
12.3 .NET and OpenSSL
.NET Framework 4.7.2 and later can also create the request, with the CertificateRequest class. The key can be a temporary key (the request is created and the key must be kept by your program) or a key stored by a Windows provider, including a smart card:
// a certificate signing request (CSR) created by .NET Framework 4.7.2 or later, with the CertificateRequest class
using (RSA rsa = RSA.Create(2048))
{
    CertificateRequest request = new CertificateRequest("CN=www.example.com, O=Example Ltd, C=RO", rsa, HashAlgorithmName.SHA256, RSASignaturePadding.Pkcs1);

    request.CertificateExtensions.Add(new X509KeyUsageExtension(X509KeyUsageFlags.DigitalSignature | X509KeyUsageFlags.KeyEncipherment, true));
    request.CertificateExtensions.Add(new X509EnhancedKeyUsageExtension(new OidCollection { new Oid("1.3.6.1.5.5.7.3.1") }, false));   // Server Authentication

    SubjectAlternativeNameBuilder names = new SubjectAlternativeNameBuilder();
    names.AddDnsName("www.example.com");
    names.AddDnsName("example.com");
    request.CertificateExtensions.Add(names.Build());

    // the request, in the PEM format that the certification authorities and X509CertificateGenerator accept
    string pem = "-----BEGIN CERTIFICATE REQUEST-----" + Environment.NewLine +
                 Convert.ToBase64String(request.CreateSigningRequest(), Base64FormattingOptions.InsertLineBreaks) + Environment.NewLine +
                 "-----END CERTIFICATE REQUEST-----";
    File.WriteAllText("request.csr", pem);

    // the private key must be kept until the certificate comes back: here as an XML file, that must be protected like a password
    File.WriteAllText("request.key.xml", rsa.ToXmlString(true));
}
Console.WriteLine(File.ReadAllText("request.csr").Substring(0, 80) + "...");
// the certification authority returned the certificate (issued.cer) for the request of the previous example:
// join it with the private key that was kept and save both in a PFX file
X509Certificate2 issued = new X509Certificate2("issued.cer");

using (RSA rsa = new RSACryptoServiceProvider())
{
    rsa.FromXmlString(File.ReadAllText("request.key.xml"));

    using (X509Certificate2 withKey = issued.CopyWithPrivateKey(rsa))
    {
        File.WriteAllBytes("issued.pfx", withKey.Export(X509ContentType.Pfx, "123456"));
        Console.WriteLine("PFX created: " + withKey.Subject + ", private key: " + withKey.HasPrivateKey);
    }
}
With a key stored in a provider, the private key stays in the provider (the only copy that exists) and the answer is linked to it with CopyWithPrivateKey. Use the name of the provider of the smart card to create the key on the card:
// the key pair is generated by a Windows provider (here the software Key Storage Provider; use the name of the provider of
// your smart card or token to generate the key ON the card: the private key never leaves it)
string provider = "Microsoft Software Key Storage Provider";    // "SafeNet Smart Card Key Storage Provider", "Microsoft Smart Card Key Storage Provider"...
string keyName = "ExampleKey-" + Guid.NewGuid();

CngKeyCreationParameters parameters = new CngKeyCreationParameters
{
    Provider = new CngProvider(provider),
    KeyUsage = CngKeyUsages.AllUsages,
    KeyCreationOptions = CngKeyCreationOptions.None                      // not exportable
};
parameters.Parameters.Add(new CngProperty("Length", BitConverter.GetBytes(2048), CngPropertyOptions.None));

using (CngKey key = CngKey.Create(CngAlgorithm.Rsa, keyName, parameters))   // a smart card asks for the PIN here
using (RSA rsa = new RSACng(key))
{
    CertificateRequest request = new CertificateRequest("CN=John Smith, O=Example Ltd", rsa, HashAlgorithmName.SHA256, RSASignaturePadding.Pkcs1);
    request.CertificateExtensions.Add(new X509KeyUsageExtension(X509KeyUsageFlags.DigitalSignature, true));

    File.WriteAllText("ksp-request.csr", "-----BEGIN CERTIFICATE REQUEST-----" + Environment.NewLine +
        Convert.ToBase64String(request.CreateSigningRequest(), Base64FormattingOptions.InsertLineBreaks) + Environment.NewLine +
        "-----END CERTIFICATE REQUEST-----");
}
File.WriteAllText("ksp-keyname.txt", provider + "|" + keyName);
Console.WriteLine("Request saved; the key " + keyName + " is in " + provider);
// the certification authority returned the certificate (issued.cer): link it to the key that created the request and install it
string[] saved = File.ReadAllText("ksp-keyname.txt").Split('|');
X509Certificate2 issued = new X509Certificate2("ksp-issued.cer");

using (CngKey key = CngKey.Open(saved[1], new CngProvider(saved[0])))
using (RSA rsa = new RSACng(key))
using (X509Certificate2 withKey = issued.CopyWithPrivateKey(rsa))
using (X509Store store = new X509Store(StoreName.My, StoreLocation.CurrentUser))
{
    store.Open(OpenFlags.ReadWrite);
    store.Add(withKey);                                                  // the certificate is now in the Personal store, bound to the key of the provider
}

using (X509Store store = new X509Store(StoreName.My, StoreLocation.CurrentUser))
{
    store.Open(OpenFlags.ReadOnly);
    X509Certificate2 installed = store.Certificates.Cast<X509Certificate2>().First(c => c.Thumbprint == issued.Thumbprint);
    Console.WriteLine("Installed: " + installed.Subject + ", private key: " + installed.HasPrivateKey);
}
OpenSSL (Linux web servers, network devices, programs that are not from Windows) creates the key and the request in a single command. The key is saved in a file (server.key) that the web server uses together with the certificate:
rem RSA 2048 key and request, with alternative names (OpenSSL 1.1.1 or later)
openssl req -new -newkey rsa:2048 -nodes -keyout server.key -out server.csr -subj "/CN=www.example.com/O=Example Ltd/C=RO" -addext "subjectAltName=DNS:www.example.com,DNS:example.com"

rem ECDSA P-256 key and request
openssl req -new -newkey ec -pkeyopt ec_paramgen_curve:prime256v1 -nodes -keyout server-ec.key -out server-ec.csr -subj "/CN=www.example.com"

rem look inside a request, to check the subject, the public key and the signature
openssl req -in server.csr -noout -text -verify

rem join the certificate and the key in a PFX file (for Windows / IIS). A .cer file in the DER (binary) format is converted to PEM first
openssl x509 -inform DER -in certificate.cer -out certificate.pem
openssl pkcs12 -export -inkey server.key -in certificate.pem -out server.pfx
The CSR can be signed by PFX Certificate Generator (section 9) or by the X509CertificateGenerator class (section 14.1). The names of the request (the Subject Alternative Names) are not copied by the certification authority: write them in the window or in the code that signs.
13. Certificates for special purposes
Some programs accept only a certificate that has exactly the right usage. The templates of the program set it for you; this chapter lists what each purpose requires and how to use the certificate afterwards.
13.1 Time stamping (TSA)
A time stamp server (TSA, RFC 3161) signs a proof that a document existed at a given time. The server needs a special certificate. Regular certificates (SSL, code signing, user signatures) cannot be used as a time stamp certificate. It must have:
an RSA 2048 key (or stronger) and a hash SHA-256 or stronger;
the key usage Digital Signature, marked as critical;
the enhanced key usage only Time Stamping (OID 1.3.6.1.5.5.7.3.8), marked as critical: no other purpose may be added;
a validity of one year or more.
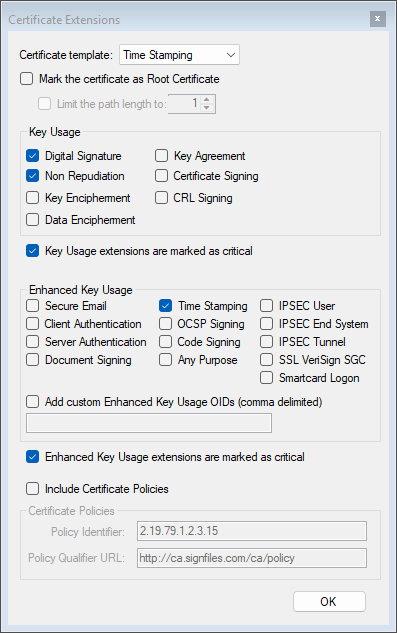
In PFX Certificate Generator select the Time Stamping template and generate the certificate as a PFX file (the template also sets Non Repudiation in the key usage, which time stamp servers accept):
The Time Stamping template: Time Stamping is the only enhanced key usage, and both extensions are critical.
The same certificate from code is in the example of section 14.1 (cs07-purposes). Then load the PFX file in the time stamp server. Our Time Stamp Server (an IIS application) can use the certificate from a PFX file or from the Windows store; two rules apply:
The ASP.NET application does not see the Current User store of your account. Install the certificate in the Local Computer store, or run the application pool under the account that owns the certificate (section 11.3).
A certificate on a smart card or a USB token usually cannot be used by a web application (the PIN window, the limits of the middleware). A certificate on an HSM can be used if the partition is activated and no PIN is asked for each signature.
The time stamp of a document that was signed with a certificate that you created is trusted by Adobe Reader and other readers only if they trust the root of the time stamp certificate: the answer is shown as unverified (but not invalid) until the root is installed (section 8).
13.2 Code signing
A code signing certificate (key usage Digital Signature, enhanced key usage Code Signing) lets you sign programs and installers (EXE, DLL, MSI, CAB, SYS) and PowerShell scripts. After the signature, Windows shows the name of the publisher instead of Unknown publisher. The steps with the program:
Create the certificate. In PFX Certificate Generator select the Code Signing template, set the common name (the name of the company, which appears as the publisher), generate it with the password 123456 (in a test) and answer Yes when Windows asks to install the root certificate:
The root certificate of the certificate that signs the code.
Sign the file. With the Microsoft tool signtool (part of the Windows SDK):
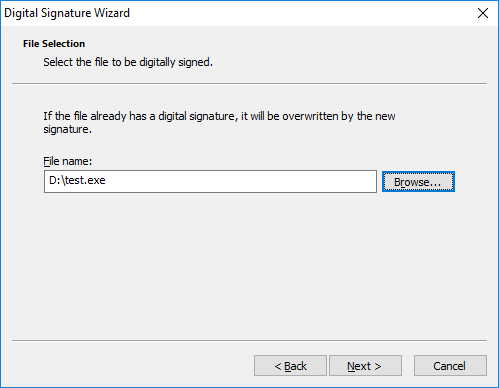
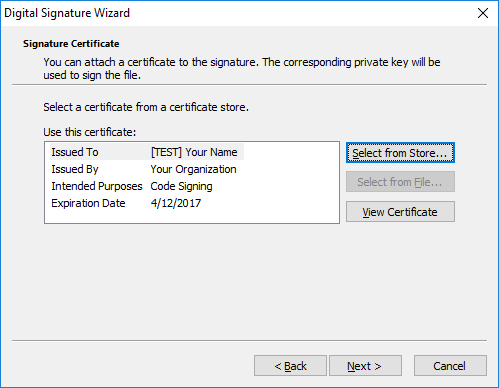
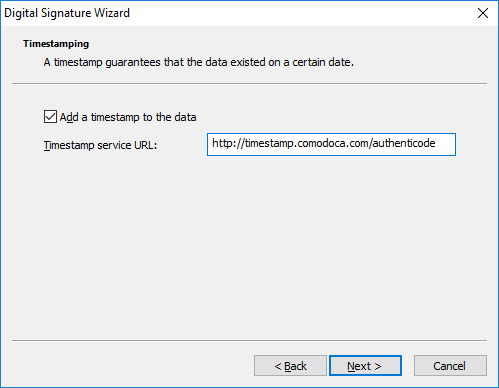
Or with the signing wizard of Windows:
Select the file.Select the certificate (Select from Store or Select from File).Add a time stamp: the signature stays valid after the certificate expires.
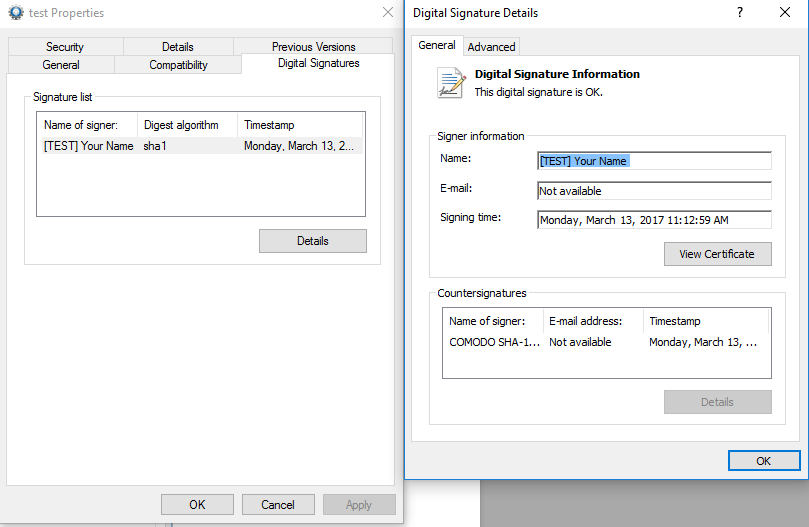
Check the result. In the properties of the file, tab Digital Signatures:
The digital signature of a program, with the time stamp.
For PowerShell scripts (and for EXE files) the signature can also be applied without signtool:
With a certificate that you created, the signature is valid and the file is not changed, but Windows reports it as not trusted (A certificate chain processed, but terminated in a root certificate which is not trusted by the trust provider) until the root is installed in Trusted Root Certification Authorities and the certificate in Trusted Publishers. This is how the tests of our example ended: the signature was created, and Get-AuthenticodeSignature showed UnknownError with this message. For the programs that you give to other people, buy a code signing certificate from a certification authority.
13.3 Revocation (CRL, OCSP)
A CA can revoke a certificate (for example when the owner leaves the company). The validators find out from a CRL (a list of the revoked certificates, published at a web address) or from an OCSP server, and the addresses are written in the certificate. PFX Certificate Generator is a desktop program: it cannot publish a CRL, so the certificates that it issues do not contain a CRL address. Most programs ignore the missing address, but some require it: for example, the signatures made with a certificate without a CRL address were reported as invalid by Microsoft Office 2010, while Office 2007 and Adobe Reader accepted them.
If you need these addresses (for example to test a validation program) create the certificate with the Signature Library: the class X509CertificateGenerator writes the CRL distribution point, the OCSP address and the address of the CA certificate (cs06-revocation in section 14.1). You must publish the CRL and run the OCSP server at these addresses.
14. The X509CertificateGenerator class
The certificates of the programs are created by the class X509CertificateGenerator (namespace SignLib.Certificates) of the Signature Library, the .NET library that the products of Secure Soft use. You can use the same class in your own applications and scripts: create PFX certificates, certificates signed by your CA, certificates for a CSR, ECDSA and DSA certificates, with any extensions. The library is available at https://www.signfiles.com/sdk/SignatureLibrary.zip.
Use it: add a reference to SignLib.dll (in Visual Studio: Add Reference > Browse), for .NET Framework 4.6.2 or later; add using SignLib.Certificates;.
The serial number: the constructor takes the serial number of the library, new X509CertificateGenerator("serial number"). Without it the library works in demonstration mode: certificates are valid 30 days at most and the library waits 10 seconds when a certificate is longer.
The result:GenerateCertificate returns the PFX file as a byte[] (the certificate, its private key and, when a root is loaded, the root certificate). The public part is new X509Certificate2(pfx, password).RawData.
The private key is generated in memory; nothing is written on the disk unless your code does it.
Settings of the generator
Property / method
Meaning and default
Subject, AddToSubject(SubjectType, value)
The subject: one string ("CN=John Smith, O=Example Ltd"), or attribute by attribute (CN, O, OU, C, ST, L, E, T, SERIALNUMBER, GIVENNAME, SURNAME...). With AddToSubject a value can contain commas. One of them is required.
The alternative names: DNS, IP address, e-mail, URI. The type is detected from the value, or given by SubjectAlternativeNameType.
ValidFrom, ValidTo
The validity, in local time. Defaults: now, and one year later.
KeyAlgorithm
RSA (default), DSA or ECDSA.
KeySize
The size of an RSA or DSA key. RSA: KeySize2048Bit (default), KeySize3072Bit, KeySize4096Bit, KeySize8192Bit (KeySize512Bit and KeySize1024Bit are obsolete). DSA: 1024, 2048 or 3072 bits.
EllipticCurve
The curve of an ECDSA key: NistP256 (default), NistP384, NistP521, BrainpoolP256r1, BrainpoolP384r1, BrainpoolP512r1.
SignatureAlgorithm
The hash of the signature of the certificate (SHA256WithRSA is the default; SHA1WithRSA is not recommended; SHA384, SHA512; for DSA: SHA1WithDSA or SHA256WithDSA; for ECDSA: SHA256WithECDSA, SHA384WithECDSA, SHA512WithECDSA). Only the hash is taken from the value: the signature is RSA, DSA or ECDSA by the key of the issuer. A DSA key of 2048 or 3072 bits needs SHA-256.
SerialNumber
The serial number (a positive number). A random 128-bit number when it is not set.
FriendlyName
The name that Windows shows for the certificate. The private key in the PFX file always has its own unique name, so two certificates with the same friendly name do not share a key container.
Extensions
The key usages (AddKeyUsage), the enhanced key usages (AddEnhancedKeyUsage, by name or by Oid), the KeyUsageIsCritical and EnhancedKeyUsageIsCritical flags, the PathLengthConstraint, AddCrlDistributionPoint, AddOcspUrl, AddCaIssuersUrl, AddCertificatePolicy and QcStatements.
LoadRootCertificate(byte[] pfx, string password)
The issuer: the next certificates are signed with this CA certificate and the PFX also contains it.
GenerateCertificate(password, isCA)
Creates the certificate and returns the PFX bytes. isCA = true creates a CA certificate (Basic Constraints with CA, key usages for certificate and CRL signing); GenerateCertificate(password) is the same with false.
GenerateCertificateFromCSR(string csr)
Signs a PKCS#10 request (PEM text) with the loaded root and returns the certificate (DER), as for a CA.
Rules that the generator checks for you
An ECDSA key cannot have Key Encipherment and Data Encipherment (RFC 5480). A DSA key cannot have these and Key Agreement (RFC 3279). The generator refuses them with a clear message.
A DSA key of 2048 or 3072 bits cannot be signed with SHA-1 (it needs a 256-bit hash).
The path length of a CA certificate must be smaller than the one of the CA that issues it, and a CA with path length 0 cannot issue a CA certificate.
A CSR must have a valid signature (the applicant owns the key).
14.1 C#
All the examples use these namespaces, and every example below was compiled and run with the library to check the result. The files are written in the current folder.
using System;
using System.IO;
using System.Linq;
using System.Security.Cryptography;
using System.Security.Cryptography.X509Certificates;
using SignLib;                 // the library
using SignLib.Cades;           // CadesSignature (the last example)
using SignLib.Certificates;    // X509CertificateGenerator and its settings
Remark: SignLib has its own HashAlgorithm enumeration; if you also use System.Security.Cryptography write SignLib.HashAlgorithm where you need it.
A self-signed certificate, the PFX file and the .cer file
X509CertificateGenerator generator = new X509CertificateGenerator("serial number");

generator.Subject = "CN=John Smith, O=Example Ltd, C=RO, E=john@example.com";
generator.ValidFrom = DateTime.Now;
generator.ValidTo = DateTime.Now.AddYears(2);
generator.KeySize = KeySize.KeySize2048Bit;                           // RSA key (the default)
generator.SignatureAlgorithm = SignatureAlgorithm.SHA256WithRSA;      // the hash of the signature of the certificate
generator.FriendlyName = "John Smith";                                // the name that Windows shows for the certificate

// what the certificate can be used for
generator.Extensions.AddKeyUsage(CertificateKeyUsage.DigitalSignature);
generator.Extensions.AddKeyUsage(CertificateKeyUsage.NonRepudiation);
generator.Extensions.AddEnhancedKeyUsage(CertificateEnhancedKeyUsage.DocumentSigning);

// the PFX file: the certificate and its private key, protected by the password
byte[] pfx = generator.GenerateCertificate("123456");
File.WriteAllBytes("john.pfx", pfx);

// the public part (.cer): the file that you give to the people who verify your signatures
X509Certificate2 certificate = new X509Certificate2(pfx, "123456");
File.WriteAllBytes("john.cer", certificate.RawData);

Console.WriteLine("Subject:     " + certificate.Subject);
Console.WriteLine("Valid until: " + certificate.NotAfter.ToShortDateString());
Console.WriteLine("Private key: " + certificate.HasPrivateKey);
Console.WriteLine("Friendly:    " + certificate.FriendlyName);
Subject:     CN=John Smith, O=Example Ltd, C=RO, E=john@example.com
Valid until: 10/6/2028
Private key: True
Friendly:    John Smith
A certificate for a web server (SSL / TLS)
The names of the site go in the Subject Alternative Names; a serial number can be set; the usage is Server Authentication.
// a TLS (SSL) server certificate for a web site
X509CertificateGenerator generator = new X509CertificateGenerator("serial number");

// AddToSubject keeps the commas of the values: O = "Example, Inc." is a single value
generator.AddToSubject(SubjectType.CN, "www.example.com");
generator.AddToSubject(SubjectType.O, "Example, Inc.");
generator.AddToSubject(SubjectType.C, "US");

// Subject Alternative Names: the type of each name (DNS, IP address, e-mail, URI) is detected from its value
generator.SubjectAlternativeNames = "www.example.com, example.com, 192.168.1.10, admin@example.com";
generator.AddSubjectAlternativeName(SubjectAlternativeNameType.Uri, "https://www.example.com/");

generator.SerialNumber = 1234567890123;                                // positive number; random 128-bit number if not set
generator.ValidTo = DateTime.Now.AddYears(1);

generator.Extensions.AddKeyUsage(CertificateKeyUsage.DigitalSignature);
generator.Extensions.AddKeyUsage(CertificateKeyUsage.KeyEncipherment);
generator.Extensions.KeyUsageIsCritical = true;
generator.Extensions.AddEnhancedKeyUsage(CertificateEnhancedKeyUsage.ServerAuthentication);
generator.Extensions.AddEnhancedKeyUsage(CertificateEnhancedKeyUsage.ClientAuthentication);

byte[] pfx = generator.GenerateCertificate("123456");
File.WriteAllBytes("www.example.com.pfx", pfx);

X509Certificate2 certificate = new X509Certificate2(pfx, "123456");
Console.WriteLine("Subject: " + certificate.Subject);
Console.WriteLine("Serial number: " + certificate.SerialNumber.TrimStart('0'));
foreach (X509Extension extension in certificate.Extensions)
    if (extension.Oid.Value == "2.5.29.17")                            // Subject Alternative Name
        Console.WriteLine(extension.Format(true));
Subject: C=US, O="Example, Inc.", CN=www.example.com
Serial number: 11F71FB04CB
DNS Name=www.example.com
DNS Name=example.com
IP Address=192.168.1.10
RFC822 Name=admin@example.com
URL=https://www.example.com/
ECDSA and DSA certificates
// an ECDSA certificate (NIST P-384)
X509CertificateGenerator ec = new X509CertificateGenerator("serial number");
ec.Subject = "CN=ECDSA signer, O=Example Ltd";
ec.KeyAlgorithm = KeyAlgorithm.ECDSA;
ec.EllipticCurve = EllipticCurve.NistP384;                             // NistP256 (default), NistP384, NistP521, BrainpoolP256r1, BrainpoolP384r1, BrainpoolP512r1
ec.SignatureAlgorithm = SignatureAlgorithm.SHA384WithECDSA;            // the hash; the signature is ECDSA when the issuer key is ECDSA
ec.Extensions.AddKeyUsage(CertificateKeyUsage.DigitalSignature);       // KeyEncipherment and DataEncipherment are not allowed for an ECDSA key
X509Certificate2 ecCertificate = new X509Certificate2(ec.GenerateCertificate("123456"), "123456");
Console.WriteLine("ECDSA: " + ecCertificate.PublicKey.Oid.FriendlyName + ", signature " + ecCertificate.SignatureAlgorithm.FriendlyName);

// a DSA certificate (2048 bits needs SHA-256; 1024 bits can use SHA-1)
X509CertificateGenerator dsa = new X509CertificateGenerator("serial number");
dsa.Subject = "CN=DSA signer, O=Example Ltd";
dsa.KeyAlgorithm = KeyAlgorithm.DSA;
dsa.KeySize = KeySize.KeySize2048Bit;                                  // 1024, 2048 or 3072 bits
dsa.SignatureAlgorithm = SignatureAlgorithm.SHA256WithDSA;             // SHA1WithDSA or SHA256WithDSA
dsa.Extensions.AddKeyUsage(CertificateKeyUsage.DigitalSignature);      // a DSA key can only sign: no encipherment, no key agreement
X509Certificate2 dsaCertificate = new X509Certificate2(dsa.GenerateCertificate("123456"), "123456");
// Windows has no name for the DSA / SHA-256 signature, so its OID is shown (2.16.840.1.101.3.4.3.2)
Console.WriteLine("DSA:   " + dsaCertificate.PublicKey.Oid.FriendlyName + ", signature OID " + dsaCertificate.SignatureAlgorithm.Value);
ECDSA: ECC, signature sha384ECDSA
DSA:   DSA, signature OID 2.16.840.1.101.3.4.3.2
A certification authority: root, intermediate and user certificate
The whole chain, with the path length limits and the check of the chain. The PFX of the user also contains the issuing CA; the root is distributed separately, as a .cer file.
// 1. the root CA certificate (self-signed), allowed to issue one level of CA certificates
X509CertificateGenerator root = new X509CertificateGenerator("serial number");
root.Subject = "CN=Example Root CA, O=Example Ltd";
root.KeySize = KeySize.KeySize4096Bit;
root.ValidTo = DateTime.Now.AddYears(10);
root.Extensions.AddKeyUsage(CertificateKeyUsage.CertificateSigning);
root.Extensions.AddKeyUsage(CertificateKeyUsage.CRLSigning);
root.Extensions.PathLengthConstraint = 1;                              // -1 (the default): no limit
byte[] rootPfx = root.GenerateCertificate("rootPassword", true);       // true: a CA certificate
File.WriteAllBytes("root.pfx", rootPfx);

// 2. an intermediate CA certificate, issued by the root
X509CertificateGenerator intermediate = new X509CertificateGenerator("serial number");
intermediate.LoadRootCertificate(rootPfx, "rootPassword");             // the issuer
intermediate.Subject = "CN=Example Issuing CA, O=Example Ltd";
intermediate.ValidTo = DateTime.Now.AddYears(5);
intermediate.Extensions.AddKeyUsage(CertificateKeyUsage.CertificateSigning);
intermediate.Extensions.AddKeyUsage(CertificateKeyUsage.CRLSigning);
intermediate.Extensions.PathLengthConstraint = 0;                      // it can issue only end-entity certificates
byte[] intermediatePfx = intermediate.GenerateCertificate("caPassword", true);

// 3. an end-entity certificate, issued by the intermediate CA
X509CertificateGenerator user = new X509CertificateGenerator("serial number");
user.LoadRootCertificate(intermediatePfx, "caPassword");
user.Subject = "CN=Mary Jones, O=Example Ltd, E=mary@example.com";
user.ValidTo = DateTime.Now.AddYears(2);
user.Extensions.AddKeyUsage(CertificateKeyUsage.DigitalSignature);
user.Extensions.AddKeyUsage(CertificateKeyUsage.NonRepudiation);
user.Extensions.AddEnhancedKeyUsage(CertificateEnhancedKeyUsage.SecureEmail);
byte[] userPfx = user.GenerateCertificate("userPassword");            // the PFX contains the certificate, its key and the issuing CA
File.WriteAllBytes("mary.pfx", userPfx);

// the public part of the root: install it on the computers that must trust the certificates (never distribute the PFX of a CA)
X509Certificate2 rootCertificate = new X509Certificate2(rootPfx, "rootPassword");
File.WriteAllBytes("root.cer", rootCertificate.RawData);

// check the chain with the standard .NET class. The PFX of the user also contains the issuing CA; the root is not installed
// on this computer, so it is given as an extra certificate and the "unknown CA" status is accepted
X509Certificate2Collection fromPfx = new X509Certificate2Collection();
fromPfx.Import(userPfx, "userPassword", X509KeyStorageFlags.DefaultKeySet);
X509Certificate2 maryCertificate = new X509Certificate2(userPfx, "userPassword");

X509Chain chain = new X509Chain();
chain.ChainPolicy.RevocationMode = X509RevocationMode.NoCheck;
chain.ChainPolicy.ExtraStore.AddRange(fromPfx);
chain.ChainPolicy.ExtraStore.Add(rootCertificate);
chain.ChainPolicy.VerificationFlags = X509VerificationFlags.AllowUnknownCertificateAuthority;
Console.WriteLine("Chain built: " + chain.Build(maryCertificate));
foreach (X509ChainElement element in chain.ChainElements)
    Console.WriteLine("  " + element.Certificate.Subject);
Chain built: True
  CN=Mary Jones, O=Example Ltd, E=mary@example.com
  CN=Example Issuing CA, O=Example Ltd
  CN=Example Root CA, O=Example Ltd
Sign a request (CSR) as a certification authority
The request can come from IIS, OpenSSL, certreq, a smart card or the code below (request.csr, created in section 12.3).
// a small certification authority: it signs a request (CSR, PKCS#10, PEM text) received from a user or from a web server
X509CertificateGenerator ca = new X509CertificateGenerator("serial number");
ca.LoadRootCertificate(File.ReadAllBytes("root.pfx"), "rootPassword");
ca.ValidTo = DateTime.Now.AddYears(1);

// the subject and the public key come from the request; the usages come from the CA
ca.Extensions.AddKeyUsage(CertificateKeyUsage.DigitalSignature);
ca.Extensions.AddKeyUsage(CertificateKeyUsage.KeyEncipherment);
ca.Extensions.AddEnhancedKeyUsage(CertificateEnhancedKeyUsage.ServerAuthentication);
ca.SubjectAlternativeNames = "www.example.com, example.com";            // the names of the request are not copied: set them here

string csr = File.ReadAllText("request.csr");                          // -----BEGIN CERTIFICATE REQUEST----- or -----BEGIN NEW CERTIFICATE REQUEST-----
byte[] certificate = ca.GenerateCertificateFromCSR(csr);                 // the certificate, DER encoded

File.WriteAllBytes("issued.cer", certificate);
X509Certificate2 issued = new X509Certificate2(certificate);
Console.WriteLine("Issued to: " + issued.Subject);
Console.WriteLine("Issued by: " + issued.Issuer);
Issued to: CN=www.example.com, O=Example Ltd, C=RO
Issued by: CN=Example Root CA, O=Example Ltd
Revocation addresses and policies
// the addresses written in the certificate: the validators use them to check if the certificate was revoked
X509CertificateGenerator generator = new X509CertificateGenerator("serial number");
generator.Subject = "CN=Test signer, O=Example Ltd";
generator.Extensions.AddKeyUsage(CertificateKeyUsage.DigitalSignature);

generator.Extensions.AddCrlDistributionPoint("http://crl.example.com/ca.crl");   // where the CRL is published
generator.Extensions.AddOcspUrl("http://ocsp.example.com");                     // the OCSP responder
generator.Extensions.AddCaIssuersUrl("http://www.example.com/ca.cer");          // where the certificate of the issuer can be downloaded

// a certificate policy, with a link to the Certification Practice Statement and a user notice
generator.Extensions.AddCertificatePolicy("1.2.3.4.5", "https://www.example.com/cps", "Certificate for tests");

X509Certificate2 certificate = new X509Certificate2(generator.GenerateCertificate("123456"), "123456");
foreach (X509Extension extension in certificate.Extensions)
    Console.WriteLine(extension.Oid.FriendlyName + " (" + extension.Oid.Value + ")");
Key Usage (2.5.29.15)
CRL Distribution Points (2.5.29.31)
Authority Information Access (1.3.6.1.5.5.7.1.1)
Certificate Policies (2.5.29.32)
Subject Key Identifier (2.5.29.14)
Time stamping, code signing and custom purposes
// a time stamping (TSA) certificate: RSA 2048, SHA-256 or better, Key Usage = Digital Signature (critical),
// Enhanced Key Usage = ONLY Time Stamping (critical), valid one year or more
X509CertificateGenerator tsa = new X509CertificateGenerator("serial number");
tsa.Subject = "CN=Example Time Stamp Authority, O=Example Ltd";
tsa.KeySize = KeySize.KeySize2048Bit;
tsa.SignatureAlgorithm = SignatureAlgorithm.SHA256WithRSA;
tsa.ValidTo = DateTime.Now.AddYears(5);
tsa.Extensions.AddKeyUsage(CertificateKeyUsage.DigitalSignature);
tsa.Extensions.KeyUsageIsCritical = true;
tsa.Extensions.AddEnhancedKeyUsage(CertificateEnhancedKeyUsage.TimeStamping);
tsa.Extensions.EnhancedKeyUsageIsCritical = true;
File.WriteAllBytes("tsa.pfx", tsa.GenerateCertificate("123456"));

// a code signing certificate (EXE, DLL, MSI, CAB, PowerShell scripts)
X509CertificateGenerator code = new X509CertificateGenerator("serial number");
code.Subject = "CN=Example Ltd, O=Example Ltd, C=RO";
code.ValidTo = DateTime.Now.AddYears(3);
code.Extensions.AddKeyUsage(CertificateKeyUsage.DigitalSignature);
code.Extensions.KeyUsageIsCritical = true;
code.Extensions.AddEnhancedKeyUsage(CertificateEnhancedKeyUsage.CodeSigning);
File.WriteAllBytes("codesigning.pfx", code.GenerateCertificate("123456"));

// any other Enhanced Key Usage, by its OID (here: Microsoft Document Signing)
X509CertificateGenerator custom = new X509CertificateGenerator("serial number");
custom.Subject = "CN=Custom purpose";
custom.Extensions.AddEnhancedKeyUsage(new System.Security.Cryptography.Oid("1.3.6.1.4.1.311.10.3.12"));
Console.WriteLine("Custom OID certificate: " + new X509Certificate2(custom.GenerateCertificate("123456"), "123456").Subject);

foreach (string file in new[] { "tsa.pfx", "codesigning.pfx" })
{
    X509Certificate2 c = new X509Certificate2(file, "123456");
    foreach (X509Extension extension in c.Extensions)
        if (extension is X509EnhancedKeyUsageExtension)
            Console.WriteLine(file + ": " + extension.Format(false) + " (critical: " + extension.Critical + ")");
}
Custom OID certificate: CN=Custom purpose
tsa.pfx: Time Stamping (1.3.6.1.5.5.7.3.8) (critical: True)
codesigning.pfx: Code Signing (1.3.6.1.5.5.7.3.3) (critical: False)
A test certificate that declares itself qualified
For the tests of the applications that read the QCStatements extension (eIDAS, ETSI EN 319 412-5). The certificate is not a qualified certificate: only a qualified trust service provider issues these.
// a TEST certificate that declares itself qualified (QCStatements, ETSI EN 319 412-5), to test the code that reads these statements.
// It is NOT a qualified certificate: only a qualified trust service provider issues those.
X509CertificateGenerator generator = new X509CertificateGenerator("serial number");
generator.AddToSubject(SubjectType.CN, "Test Qualified Signer");
generator.AddToSubject(SubjectType.SERIALNUMBER, "PNORO-1234567890123");
generator.Extensions.AddKeyUsage(CertificateKeyUsage.NonRepudiation);

generator.Extensions.QcStatements = new QualifiedCertificateStatements
{
    QcCompliance = true,                                     // an EU qualified certificate
    QcSscd = true,                                           // the key is in a qualified signature creation device
    QcType = QualifiedCertificateType.ESign,                 // a certificate for electronic signatures
    SemanticsIdentifier = QcSemanticsIdentifier.NaturalPerson,
    RetentionPeriod = 10                                     // years
};
generator.Extensions.AddCertificatePolicy("0.4.0.194112.1.2");   // QCP-n-qscd

X509Certificate2 certificate = new X509Certificate2(generator.GenerateCertificate("123456"), "123456");
Console.WriteLine("Declares itself qualified: " + DigitalCertificate.IsQualifiedCertificate(certificate));
Declares itself qualified: True
Sign a file with the new certificate
The certificate can be used immediately by the signature classes of the library (here a CAdES signature of any file):
// sign a file in the CAdES format with the certificate that was just created (SignLib)
CadesSignature signature = new CadesSignature("serial number");
signature.DigitalSignatureCertificate = DigitalCertificate.LoadCertificate("john.pfx", "123456");
signature.SignatureStandard = CadesSignatureStandard.CadesBes;
signature.HashAlgorithm = SignLib.HashAlgorithm.SHA256;

File.WriteAllText("contract.txt", "The text of the contract");
File.WriteAllBytes("contract.txt.p7s", signature.ApplyDigitalSignature("contract.txt"));

CadesVerify verify = new CadesVerify("contract.txt.p7s", "serial number");
Console.WriteLine("Signatures: " + verify.Signatures.Count + ", valid: " + verify.Signatures[0].SignatureIsValid);
Signatures: 1, valid: True
Install the certificate in the Windows store from code
The certificates are installed with the standard .NET class X509Store (see also section 11.4):
// a PFX certificate (with its private key) in the Personal store of the current user
X509Certificate2 signingCert = new X509Certificate2("john.pfx", "123456", X509KeyStorageFlags.PersistKeySet);

using (X509Store personal = new X509Store(StoreName.My, StoreLocation.CurrentUser))
{
    personal.Open(OpenFlags.ReadWrite);
    personal.Add(signingCert);
}

// the same for the Local Computer store (administrator rights): a service account can use the certificate
using (X509Store machine = new X509Store(StoreName.My, StoreLocation.LocalMachine))
{
    machine.Open(OpenFlags.ReadWrite);
    machine.Add(signingCert);
}

// a root certificate (public part only) in the Trusted Root Certification Authorities store:
// for the current user Windows asks the user to confirm; for the local computer it needs administrator rights
using (X509Store roots = new X509Store(StoreName.Root, StoreLocation.CurrentUser))
{
    roots.Open(OpenFlags.ReadWrite);
    roots.Add(new X509Certificate2("root.cer"));
}
The certificate of a smart card appears in the Personal store when the driver of the card is installed and the card is inserted. For a signature with it the library asks the same PIN as Windows; see the Signature Library manual.
14.2 VB.NET
The same classes in VB.NET (Imports SignLib.Certificates; the examples were compiled and run):
Dim generator As New X509CertificateGenerator("serial number")

generator.Subject = "CN=John Smith, O=Example Ltd, C=RO, E=john@example.com"
generator.ValidFrom = DateTime.Now
generator.ValidTo = DateTime.Now.AddYears(2)
generator.KeySize = KeySize.KeySize2048Bit
generator.SignatureAlgorithm = SignatureAlgorithm.SHA256WithRSA
generator.FriendlyName = "John Smith"

generator.Extensions.AddKeyUsage(CertificateKeyUsage.DigitalSignature)
generator.Extensions.AddKeyUsage(CertificateKeyUsage.NonRepudiation)
generator.Extensions.AddEnhancedKeyUsage(CertificateEnhancedKeyUsage.DocumentSigning)

' the PFX file (certificate + private key, protected by the password) and the .cer file (public part)
Dim pfx As Byte() = generator.GenerateCertificate("123456")
File.WriteAllBytes("john-vb.pfx", pfx)

Dim certificate As New X509Certificate2(pfx, "123456")
File.WriteAllBytes("john-vb.cer", certificate.RawData)

Console.WriteLine("Subject:     " & certificate.Subject)
Console.WriteLine("Valid until: " & certificate.NotAfter.ToShortDateString())
Console.WriteLine("Private key: " & certificate.HasPrivateKey)
A root certificate and the certificate that it issues
' the root certificate (a CA certificate, issued to itself)
Dim root As New X509CertificateGenerator("serial number")
root.Subject = "CN=Example Root CA (VB), O=Example Ltd"
root.KeySize = KeySize.KeySize4096Bit
root.ValidTo = DateTime.Now.AddYears(10)
root.Extensions.AddKeyUsage(CertificateKeyUsage.CertificateSigning)
root.Extensions.AddKeyUsage(CertificateKeyUsage.CRLSigning)
root.Extensions.PathLengthConstraint = 0                      ' it issues only end-entity certificates
Dim rootPfx As Byte() = root.GenerateCertificate("rootPassword", True)

' a certificate issued by the root
Dim user As New X509CertificateGenerator("serial number")
user.LoadRootCertificate(rootPfx, "rootPassword")
user.Subject = "CN=Mary Jones (VB), O=Example Ltd"
user.ValidTo = DateTime.Now.AddYears(2)
user.Extensions.AddKeyUsage(CertificateKeyUsage.DigitalSignature)
user.Extensions.AddKeyUsage(CertificateKeyUsage.NonRepudiation)
Dim userPfx As Byte() = user.GenerateCertificate("userPassword")

Dim rootCertificate As New X509Certificate2(rootPfx, "rootPassword")
Dim maryCertificate As New X509Certificate2(userPfx, "userPassword")

Dim chain As New X509Chain()
chain.ChainPolicy.RevocationMode = X509RevocationMode.NoCheck
chain.ChainPolicy.ExtraStore.Add(rootCertificate)
chain.ChainPolicy.VerificationFlags = X509VerificationFlags.AllowUnknownCertificateAuthority

Console.WriteLine("Chain built: " & chain.Build(maryCertificate))
For Each element As X509ChainElement In chain.ChainElements
    Console.WriteLine("  " & element.Certificate.Subject)
Next
Chain built: True
  CN=Mary Jones (VB), O=Example Ltd
  CN=Example Root CA (VB), O=Example Ltd
A request (CSR) with an ECDSA key, and its certificate
' a request (CSR) with an ECDSA key, created by .NET, and the certificate that a small certification authority issues for it
Dim csr As String
Using ecdsa As ECDsa = ECDsa.Create(ECCurve.NamedCurves.nistP256)
    Dim request As New CertificateRequest("CN=Device 0001 (VB), O=Example Ltd", ecdsa, HashAlgorithmName.SHA256)
    request.CertificateExtensions.Add(New X509KeyUsageExtension(X509KeyUsageFlags.DigitalSignature, True))

    csr = "-----BEGIN CERTIFICATE REQUEST-----" & vbCrLf &
          Convert.ToBase64String(request.CreateSigningRequest(), Base64FormattingOptions.InsertLineBreaks) & vbCrLf &
          "-----END CERTIFICATE REQUEST-----"
End Using

Dim ca As New X509CertificateGenerator("serial number")
ca.LoadRootCertificate(File.ReadAllBytes("root.pfx"), "rootPassword")     ' the root created by the C# example
ca.ValidTo = DateTime.Now.AddYears(1)
ca.Extensions.AddKeyUsage(CertificateKeyUsage.DigitalSignature)

Dim der As Byte() = ca.GenerateCertificateFromCSR(csr)
Dim issued As New X509Certificate2(der)
Console.WriteLine("Issued to: " & issued.Subject)
Console.WriteLine("Key:       " & issued.PublicKey.Oid.FriendlyName & ", signature " & issued.SignatureAlgorithm.FriendlyName)
Run the script from the command line (the parameter -executionPolicy bypass allows this one script to run without changing the security settings of the computer):
Windows can create certificates with its own cmdlet: with the key in a provider of your choice, with the usage of a code signing or a TLS certificate, and issued by a CA certificate (-Signer). The example creates, lists, exports and deletes the certificates (-DeleteKey deletes the private key too):
# Windows PowerShell 5.1 and PowerShell 7 can create certificates without any library: New-SelfSignedCertificate (Windows 8 / Server 2012 or later)
$pwd = ConvertTo-SecureString "123456" -AsPlainText -Force

# a user certificate with an exportable RSA key, in the Personal store of the current user
$user = New-SelfSignedCertificate -Subject "CN=Ana Popescu, O=Example Ltd" -FriendlyName "Ana Popescu" `
    -KeyAlgorithm RSA -KeyLength 2048 -HashAlgorithm SHA256 -KeyUsage DigitalSignature, KeyEncipherment `
    -KeyExportPolicy Exportable -NotAfter (Get-Date).AddYears(2) -CertStoreLocation Cert:\CurrentUser\My

# the same certificate as a PFX file and as a .cer file
Export-PfxCertificate -Cert $user -FilePath "$PSScriptRoot\ana.pfx" -Password $pwd | Out-Null
Export-Certificate -Cert $user -FilePath "$PSScriptRoot\ana.cer" | Out-Null

# an ECDSA key (the curve is part of the algorithm name), kept by the software Key Storage Provider, not exportable
$ec = New-SelfSignedCertificate -Subject "CN=Ana Popescu EC, O=Example Ltd" -KeyAlgorithm ECDSA_nistP256 `
    -Provider "Microsoft Software Key Storage Provider" -KeyExportPolicy NonExportable -CertStoreLocation Cert:\CurrentUser\My

# a CA certificate (Basic Constraints: CA=true, one level of CAs below it) and a TLS server certificate issued by it (-Signer)
$ca = New-SelfSignedCertificate -Subject "CN=Example Root CA, O=Example Ltd" -KeyUsage CertSign, CRLSign -KeyLength 4096 `
    -TextExtension @("2.5.29.19={text}CA=true&pathlength=0") -NotAfter (Get-Date).AddYears(10) -CertStoreLocation Cert:\CurrentUser\My
$server = New-SelfSignedCertificate -DnsName "www.example.com", "example.com" -Signer $ca `
    -TextExtension @("2.5.29.37={text}1.3.6.1.5.5.7.3.1") -CertStoreLocation Cert:\CurrentUser\My

# a code signing certificate
$code = New-SelfSignedCertificate -Type CodeSigningCert -Subject "CN=Example Ltd Code Signing" -CertStoreLocation Cert:\CurrentUser\My

foreach ($c in $user, $ec, $ca, $server, $code) {
    Write-Host ($c.Subject + "  |  " + $c.PublicKey.Oid.FriendlyName + "  |  " + $c.SignatureAlgorithm.FriendlyName)
}

# list the certificates of the current user that have a private key
Get-ChildItem Cert:\CurrentUser\My | Where-Object { $_.HasPrivateKey -and $_.Subject -like "*Example Ltd*" } | Format-Table Subject, Thumbprint, NotAfter -AutoSize

# remove the certificates created by this example (-DeleteKey also deletes the private key)
foreach ($c in $user, $ec, $ca, $server, $code) { Remove-Item "Cert:\CurrentUser\My\$($c.Thumbprint)" -DeleteKey }
The browser, Windows or a program says that the certificate is not trusted.
The certificate is signed by a root that the computer does not trust. Install the root (the .cer file) in Trusted Root Certification Authorities on that computer (section 8). Without it a certificate that you created is never trusted. The certificate itself does not need to be installed there.
Error KeyEncipherment and DataEncipherment cannot be used with an ECDSA key (or DSA).
These usages are not allowed for these keys (RFC 5480, RFC 3279). The programs disable them automatically; with the library do not add them. Use Digital Signature (and Non Repudiation).
A certificate with DSA and SHA-256 is reported by Windows as Invalid algorithm specified.
Windows cannot verify the signature of a certificate that uses DSA with SHA-256. Use DSA 1024 bits with SHA-1 for a program that needs DSA and Windows, or use RSA or ECDSA. The certificate is valid for OpenSSL and Java.
The private key is not found / the certificate has no key icon.
The certificate was imported without the key (only the .cer), or the link was lost. Import the PFX file, or link the certificate to the key in the provider with certutil -repairstore (section 11.2).
certreq -accept fails with 0x800b010a (CERT_E_CHAINING).
The CA that signed the certificate is not trusted on this computer. Install its root first (section 8), or use certutil -addstore and certutil -repairstore (section 11.2), or use the CertEnroll objects with the restriction accept an untrusted certificate (section 12.2).
IIS, a service or a scheduled task does not see the certificate that I see in certmgr.msc.
They do not use your Current User store. Install the certificate in the Local Computer store and give the account the right to read the private key; or run the application pool / the service under the account that owns the certificate (section 11.3).
The smart card is not listed in Smart Card Certificate Generator.
Insert the card before you start the program, and install the driver of the card (its minidriver or middleware). By default only the providers of hardware devices are listed; check Show software providers to see the others. A card that is not in the reader is not shown.
The list of keys does not offer the key that I want (for example RSA 4096 or ECDSA P-521).
The list contains what the provider and the card support. Another provider for the same card can offer other keys (compare the CSP and the KSP).
Windows asks for the PIN again and again / the PIN is rejected.
Stop and check the PIN: the card counts the wrong PINs and blocks itself after a few. A blocked card can be unblocked only with the administrator PIN (PUK) and the tool of the manufacturer. Note that some cards have separate PINs for signing and for logon.
The card is full (error when the key or the certificate is written).
Delete the keys and the certificates that you do not use with the tool of the manufacturer (or certutil -csp ... -delkey for a key). Smart Card Certificate Generator deletes the key that it created when the installation of the certificate fails.
The certificate is reported as not yet valid on another computer.
The clock of that computer is slower. The programs start the certificate five minutes in the past; if the difference is bigger, set the Valid from date to the day before.
I do not remember the password of the PFX file.
It cannot be recovered. Create the certificate again (the previous signatures stay valid).
The signature made with my certificate is invalid in Office 2010.
Office 2010 requires a CRL address in the certificate (section 13.3). Create the certificate with the Signature Library and add the CRL address, or use a certificate from a certification authority.
A time stamp server refuses my certificate.
A time stamp certificate must have only the Time Stamping usage, critical, RSA 2048 or stronger, SHA-256 or stronger and at least one year of validity (section 13.1).
A copy of my certificate appears in Intermediate Certification Authorities.
It is created by Windows when it installs a certificate that it cannot link to a trusted root. It is harmless; it can be deleted (section 11.1).
The library writes This is a demonstration of the digital signature software and waits 10 seconds.
The serial number was not given to the constructor, or it is not valid. Give the serial number that you received for the Signature Library.
16. Glossary
Term
Meaning
X.509
The standard that defines the format of the digital certificates (and the extensions, the CRLs).
Digital certificate
A document that links a name to a public key and is signed by an issuer.
Public key, private key
The two keys of a pair. The public key is in the certificate and verifies; the private key stays secret and signs or decrypts.
PFX, PKCS#12 (.pfx, .p12)
A password-protected file with a certificate, its private key and, optionally, the chain.
CER (.cer, .crt)
A file with the public part of a certificate only: DER (binary) or PEM (Base64 text between -----BEGIN CERTIFICATE----- lines).
Root certificate, CA
A certificate that signs other certificates. A root is signed by itself; an intermediate CA is signed by another CA.
Self-signed certificate
A certificate signed by its own key. Nobody trusts it unless it is installed explicitly.
Certification path (chain)
The certificates from a user certificate up to a trusted root.
CSR, PKCS#10
Certificate Signing Request: the message with a public key and a name that is sent to a CA to obtain a certificate.
SAN (Subject Alternative Name)
The extension with the other names of the certificate (DNS names, IP addresses, e-mail addresses, URIs). Web browsers check it.
Key usage, Enhanced key usage
Extensions that say what the key can be used for (signing, encryption, server authentication, code signing...).
Critical extension
An extension that a program must understand: if it does not, it must reject the certificate.
Path length constraint
The maximum number of CA certificates that can follow a CA certificate in a path.
RSA, DSA, ECDSA
The algorithms of the key pair. RSA is the most compatible; ECDSA has short keys; DSA can only sign.
Hash (SHA-256)
A short fingerprint of data; the signature of a certificate is the signature of the hash of its content.
CSP
Cryptographic Service Provider: the old CryptoAPI provider of keys (RSA).
KSP
Key Storage Provider: the CNG provider of keys (RSA and ECDSA); the one that modern smart cards use.
Key container
The name of a key inside a provider. The certificate stores the provider and the container to find its key.
Minidriver, middleware
The driver of a smart card or a token that makes the card visible to Windows.
PIN, PUK
The password of the card, and the administrator password that unblocks it.
CRL, OCSP
Ways to find out if a certificate was revoked (a list, or an online question).
TSA, time stamp
Time Stamp Authority: a service that signs a proof of the time (RFC 3161).
Local Computer / Current User store
The two locations of the Windows certificate stores: for the computer and its services, or for the signed in user.
CertEnroll
The Windows COM interface for the creation of keys and certificate requests.
SignLib (Signature Library)
The .NET library of Secure Soft. It contains the class X509CertificateGenerator and the signature classes.
17. Warning and disclaimer, trademarks
Every effort has been made to make this manual as complete and accurate as possible, but no warranty or fitness is implied. The information provided is on an “as is” basis. The author shall have neither liability nor responsibility to any person or entity with respect to any loss or damages arising from the information contained in this manual. The information about the trust of certificates and about the signature of documents is a simplified explanation and it is not legal advice.
.NET, Windows, PowerShell, Visual Studio, IIS, Microsoft Office and Authenticode are trademarks of Microsoft Corporation. Adobe and Adobe Reader are trademarks of Adobe Systems Inc. All other trademarks are the property of their respective owners.